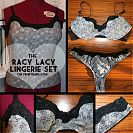
Racy lacy lingerie set

When fellow blogger Sigrid visited me last May, she brought along a birthday gift for me – a fantastic lingerie kit from Kantje Boord (a big lingerie notions shop in Amsterdam), full of really cool goodies you only ever see on high-end RTW underwear. In fact, it was all so nice that I was hesitant to cut into it as my bra-making skills are not quite as polished as the rest of my sewing yet.

But Pattern Review are having their first-ever Lingerie sewing contest, so that gave me the impetus to cut into the kit!

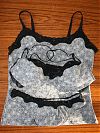
I planned on making the same partial-band, underwired bra I’d sewn once before (twice if you count the muslin) with a few improvements, plus my TNT thong panty from KnipMode, and, as it turns out, I was able to squeeze a camisole out of the yardage included in the kit, too!

Camisole

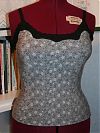
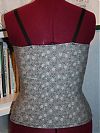
We’ll start with the largest item first, even though I made it last… This one was really easy – I started with a RTW knit vest (tank top if you’re American) that I really liked, laid it on my fabric and traced the front, then did the same with the back.

Champagne & black lacy lingerie set

As I mentioned last week, I’ve been inspired by the Cloth Habit Bra Sew-Along to try my hand at sewing some bras again. I was fairly happy with the foam cup bra I made a while back, but I finally found some Marks & Spencer’s non-padded bras that I really like the fit of and I was encouraged by these that I could probably make my own that fit nicely, too.

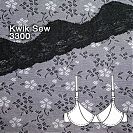
In all my previous attempts I’d used KwikSew 3300 as my base pattern, but this time around, I wanted a fresh start, so I pulled out Elan 530 which I’d bought years ago and never sewn up. The seaming of the cups is different to the KwikSew and I thought that might make all the difference for me.

In the past, I’d been really frustrated because you can’t check the fit until you’d absolutely completed sewing the bra, wasting hours and materials if the fit was off, but the Sew-Along offered some really good advice in terms of making a muslin and exactly what was important and what could be left out. So here’s mine, with some fetching gingham ribbons for straps (and underwire channelling, ha).
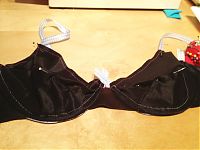
I adapted the bridge (based on excellent instructions in Orange Lingerie‘s upcoming book!!), added 1.5cm to the band as it was too tight, and pinched a little out of the cups along the seam line before unpicking it all to reuse some of the parts in the finished bra.

For the finished bra, I used the “Gabi” lace from eLingeria that Katherine also used to make a lingerie set! (That lace also comes as a handy bra kit or panty kit if you’d rather buy it that way). I had to look up my order details, but I’d bought this lace last May, and paid only €9 for the 2 meters, which is fantastic value if you ask me!

I learned a lot about careful lace placement from my sewing of the Ruby Slips so I always take a photo of the pieces before I assemble, as for some reason I can get a better overall picture when looking at a photo than I do in real life.
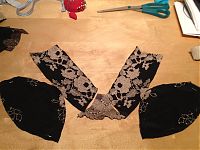
At first I didn’t overlay the bottom cups with lace, but this looked a bit weird, so I added those. Even though it’s mostly black lace on the bottoms, it makes a world of difference and cut back on the shininess.

So for the finished bra, the cups have three layers each – the lace (which is pretty flimsy, and also stretches, which you don’t want in cups), a black nylon underlining layer (with the stretch running opposite to the lace), and the same black nylon as a lining.

From my previous bra making experience, I learned a nice trick to getting everything finished and lined nicely…

A different kind of lingerie success

I’ve made three bras so far, and despite winning the PR Lingerie contest last year, I’ve never been that happy with the fit of any of those bras. I mean, they were okay, but the style is different to the kind of bras I buy, and the underwires dug in, and well, the girls just didn’t look their best. So they’ve kinda worked their way to the bottom of my lingerie drawer, which makes me sad. I sew to wear, not to shove in a drawer!

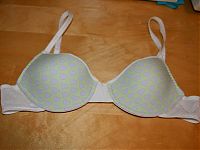
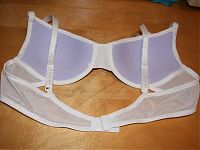
As I mentioned last week, I got very excited about the notion of sewing a bra made with foam cups, which are the sort I always buy, and speaking to Kellie at The Sewing Chest, she got me all set up with the right bits to have my first go. I made a toile using her purple hearts foam cups over the weekend and the fit is so good I wore it all day Sunday and now again Monday!

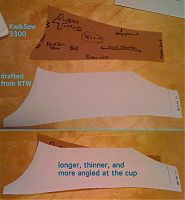
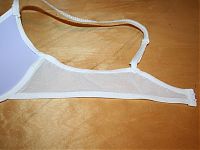
I started the process by making a rigorous comparison of the Kwik Sew 3300 pattern vs two RTW bra backs and ended up drafting a back similar to a Ted Baker one that fits me well.

Here you can see the difference between the KwikSew back (in brown) and my newly drafted-from-RTW back (in white) –

I won!

Wow! I’ve been entering Pattern Review contests for years and never even come close to winning, but I’ve won first place in the first ever Lingerie Contest!

Lingerie Contest Medium

Thank you all SO much for voting for my Racy Lacy Lingerie set, I’m so touched that it inspired so many of you to sew up some lingerie of your own.

And special thanks go to Sigrid, who inspired me to start sewing lingerie, and also gifted me the gorgeous kit that turned into the winning entry!

Silver tweed jacket

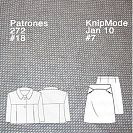
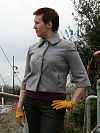
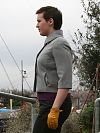
It’s time now to turn our attention to the upper half of this silver tweed Planned Partnership, the little boxy cropped jacket (#18) from Patrones 272:

You saw the jacket as part of a classy suit, but how does it work with jeans?, I hear you ask.

As it turns out, even better!

I actually prefer this jacket hanging open instead of buttoned up (which is why I left off the button loop at the very top of the collar stand and the small button hidden under the collar that the pattern suggested).

A seafoam green Ruby Slip (and matching panties)

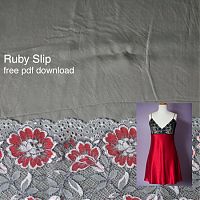
The Ruby Slip is a free pdf pattern and comprehensive set of tutorials over at Pattern Scissors Cloth, and as soon as I saw it, I knew it was just the most perfect pattern ever for me and I had to sew it ASAP!

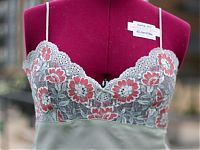
I had 2m of seafoam green silk in my stash that I’d bought at Bhopal Fabric on Brick Lane over the summer (at £6/m), so I took a swatch of that along with me to MacCulloch and Wallis just before Christmas to buy lace specifically for this. Their lace selection isn’t great, but I totally fell in love with this stretch lace, made up of seafoam green, grey, and brick-red flowers, and it was the required 18cm for the pattern. It was pretty eye wateringly-expensive at £14/m, but I ended up with a silk matching lingerie set for £40 exactly, so I think the economics of my decision were sound.

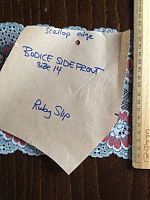
Sherry has done an incredible job going through all the ins and outs of lace cutting, bias silk sewing, how to do an FBA, etc, but I did get a surprise when I found that 18cm lace is not wide enough for the side front:

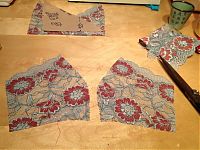
Since I went out and bought the lace specifically for this, I was a little annoyed, but I was also feeling flu-ish so I sat down with my copy of Bridal Couture and hand-pieced some lace from my scraps to make up the missing corner. It involved a ton of tiny hand stitches in both seafoam and brick to get everything to match seamlessly, but I’m pleased with the end result (she’s since posted some ways of dealing with narrow lace).

I also wanted to demonstrate how much you need to pay attention which cutting lace. I was paying heed to all of the scallops in order to get them in join up nicely at the seams, but I totally didn’t see that my motif was off at first. Happily, I had enough to re-cut that piece to have a nicer join over the seam (seen on the right).

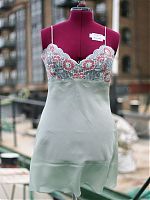
Right, all that aside, and let’s see some finished photos! But, er, not modeled on me since there’s see-through lace and I’m not an exhibitionist. So you’ll just have to take my word that I squealed with delight when I first tried this on, because the fit is just perfect! The bias skirt really just hugs my curves without being tight, and everything just fits like it was meant to be. I made the “short” version, and the hem lies about 3-4 inches above the knee, which is perfect for me.

I'm currently excited about…

My turquoise and silver motif dress is nearly done (check out the fantastic lace hem tape I found in my stash to pretty-fy my hem, too!), but it doesn’t stop me thinking ahead…

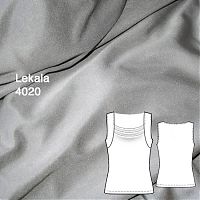
  • Lekala 4020 – My brain needs a quick knit top, and I looooove the cowl neck and shoulder yokes on this. I’ve created echoing sleeve bands on the back to decrease the “coffin back” look (the only reason I haven’t made their “S dress” yet is that I’m contemplating how to jazz up the back on it. Any ideas?). I’ve got some small lengths of silver silk jersey left in my stash that I think will find a good home in this top.

    Even better is that they’ve got every pattern available in a free size 44 pdf this month if you want to try them free before you do the custom-size thing!

  • A foam cup braOMG I am amazingly excited to learn there’s a pattern out now for making the type of bras I buy in RTW with the moulded, foam cups! It’s the Pin Up Girls “Amanda” bra pattern. I’ve made bras before, but I’ve never been happy with the fit, and I think that half my problem is that I’m trying to sew the kind of bras I never actually buy…

    I had an email chat with the lovely Kellie, owner of The Sewing Chest shop (the best UK source of elastic and boning and lingerie fabrics, hands down!), and I’m now totally excited about sewing bras again. She’s advised me to put some of her foam cups onto the non-cup parts of the KwikSew 3300 bra I’ve made before, and see how that goes. She’s also advised me to use a different underwire size, too. Fingers crossed for bra success!