My "Brazilliant" red Brasilia Dress

I’ve been wanting to make Rachel’s free Brasilia Dress pattern since she released it on Christmas Day, and I finally got the kick I needed, in the form of a big opportunity – ten days ago I was asked to speak at the House of Commons about a new stem cell bill! So of course I needed a new dress, and I figured the red stretch cotton sateen in my stash would be perfect, both for confidence and the connotation with blood.

The pattern is only available in one size (Rachel‘s), but through an extreme act of coincidence, I match her bust, waist, and hips almost exactly, only differing by a centimeter or two. Our lengths, however, are another matter entirely, so I jotted down mine for comparison on the size chart provided:

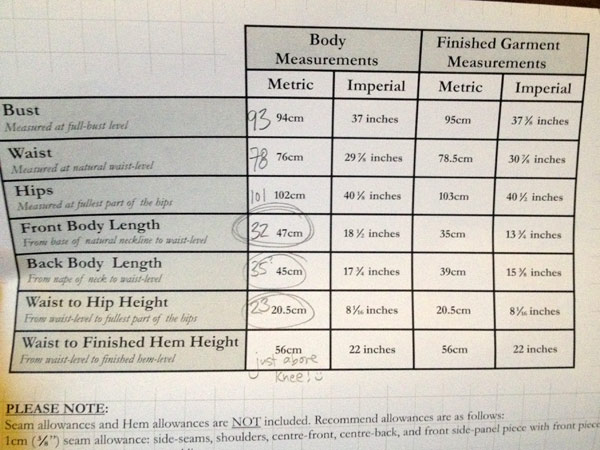
I was a bit confused as to whether I should adapt the pattern based on the given body measurements or the finished measurements (as there’s a big difference in the lengths between them), so I ended up measuring the pattern myself (which was somewhere between the two given sets) and made this match my lengths.

In the end, I removed 5cm above the waist, added 1cm between the waist and hips, and lowered the front neckline by 7cm (this latter change was just a personal style choice). My bust point was exactly the same placement as on the pattern, though in future I’d shorten the darts so they end an inch or two below the bust rather than right at the apex.

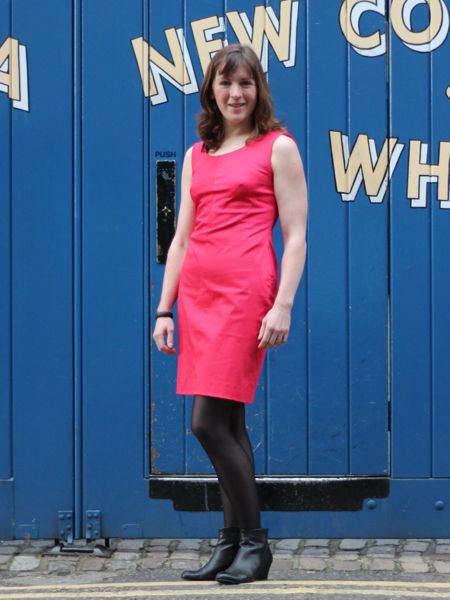
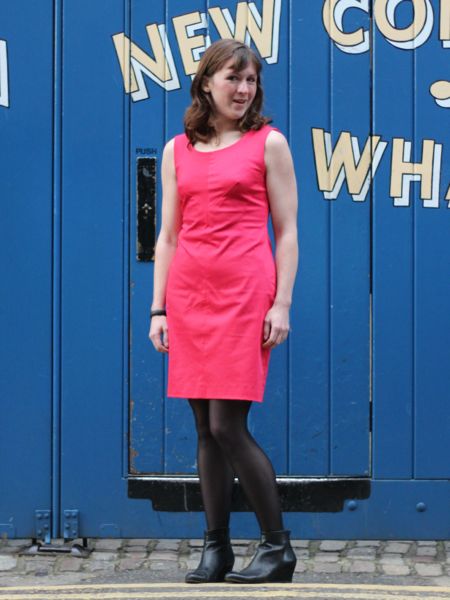
Can you believe this red stretch cotton sateen has been in my stash since 2010? What was I thinking not using it until now?! It really is cherry red and not fuchsia like in these photos, also! The only problem with stretch cotton sateen is that it shows way more wrinkles in photos than it ever does in real like! In reality, this might possibly be the best fitting sheath dress I own.

Black lingerie set – camisole & lacey thong

Wow, thank you so much for all your enthusiasm on the Lacey Thong pattern! It was downloaded nearly 200 times in the first 24 hours, and that’s without any promotion beyond your word of mouth!

I’m wondering who’s going to be the first to send me their finished panty photos, but in the meantime, I thought it might be inspiring to show you all two more lingerie sets I’ve made while I’ve been ill with shingles (and likely to continue to be ill for several more weeks, ugh).

First up is a black and champagne set comprised of my Lacey Thong pattern and the (also free!) Ruby Slip pattern, shortened to camisole length.

You may think this lace looks familiar, and that’s because it’s the same lace I used a few weeks ago to make a bra and another thong panty, so now I’ve got a set of four to wear together (and have finally used up all 2 metres of the Gabi lace I’d bought!). This time I used a thin poly(?) black satin for the body of the cami and panties, and used a beige picot elastic on the panties instead of black, like I had in my earlier set.

Champagne & black lacy lingerie set

As I mentioned last week, I’ve been inspired by the Cloth Habit Bra Sew-Along to try my hand at sewing some bras again. I was fairly happy with the foam cup bra I made a while back, but I finally found some Marks & Spencer’s non-padded bras that I really like the fit of and I was encouraged by these that I could probably make my own that fit nicely, too.

In all my previous attempts I’d used KwikSew 3300 as my base pattern, but this time around, I wanted a fresh start, so I pulled out Elan 530 which I’d bought years ago and never sewn up. The seaming of the cups is different to the KwikSew and I thought that might make all the difference for me.

In the past, I’d been really frustrated because you can’t check the fit until you’d absolutely completed sewing the bra, wasting hours and materials if the fit was off, but the Sew-Along offered some really good advice in terms of making a muslin and exactly what was important and what could be left out. So here’s mine, with some fetching gingham ribbons for straps (and underwire channelling, ha).

I adapted the bridge (based on excellent instructions in Orange Lingerie‘s upcoming book!!), added 1.5cm to the band as it was too tight, and pinched a little out of the cups along the seam line before unpicking it all to reuse some of the parts in the finished bra.

For the finished bra, I used the “Gabi” lace from eLingeria that Katherine also used to make a lingerie set! (That lace also comes as a handy bra kit or panty kit if you’d rather buy it that way). I had to look up my order details, but I’d bought this lace last May, and paid only €9 for the 2 meters, which is fantastic value if you ask me!

I learned a lot about careful lace placement from my sewing of the Ruby Slips so I always take a photo of the pieces before I assemble, as for some reason I can get a better overall picture when looking at a photo than I do in real life.

At first I didn’t overlay the bottom cups with lace, but this looked a bit weird, so I added those. Even though it’s mostly black lace on the bottoms, it makes a world of difference and cut back on the shininess.

So for the finished bra, the cups have three layers each – the lace (which is pretty flimsy, and also stretches, which you don’t want in cups), a black nylon underlining layer (with the stretch running opposite to the lace), and the same black nylon as a lining.

From my previous bra making experience, I learned a nice trick to getting everything finished and lined nicely…

Too cold for photos – just sewing instead!

As I write this, London is in the midst of the second snowfall of the year (if you count Monday’s over-hyped yet under-delivered snow, that is) and I’m bundled up in a full-body thin layer of silk (long johns), plus my wool foldover trousers, my bamboo turtleneck, two pairs of socks, and my Russian greatcoat for my 35min walk into work today. It’s nothing on the Pennsylvania winters I grew up with, but at least I feel prepared!*

The good news is that, while it’s freezing outside, my sewing cave is one of the warmest spots on the boat, so I’ve been busy!

Papercut Peter & the Wolf Trousers

The new trouser pattern from Papercut Patterns was burning a hole in my To Sew list, so I just had to try them out! I finished these before last weekend, but Saturday I was covered in mud (another cross country race) and Sunday it was freezing and I didn’t fancy a photshoot.

I did an awesome job lining up the seams on the side invisible side zipper, if I do say so myself!

I really like that they have you topstitch all the mid-leg vertical seams as well as all the yoke seams – that topstitching really makes the seaming stand out nicely. It also meant I actually finished a huge 1000m spool of black Gutermann thread! I thought those things were infinite!

I’ve not yet worn these to work (the tulip hems mean my long johns are visible in front, the horror!) but I can tell already they’ve got a nice fit throughout – I especially like the trouser hems and the hip yokes, though they do mean the pockets are placed further down the leg than I’m used to…

I’ll try to get some photos this weekend, even though the details will be lost in the dark brown stretch twill (hey, it was in the stash alright!?) I’d bought in Paris last Spring. I didn’t have any particular attachment to it and it was a stretch woven as per the pattern requirements, so I made these as a trial version (or wearable muslin if you prefer). I might fancy making these again in some stretch wool suiting in my stash from last winter…

Another Chic Sweatshirt

When my parents were visiting in October, my mom looked through all my recent makes and decided she’d like a chic sweatshirt for her belated Christmas gift, and she picked out a lovely lavender sweatshirting for it while she was here. Remember how lovely she looks in lavender? I think it was a great choice. For my gift, she re-taught herself to crochet and made me a wonderful hat in mustard wool I picked out. Hooray for our little skills exchange!

Amsterdamage – lingerie and marathon edition

What a weekend! I’ve been to Amsterdam several times before, so I felt zero need to see the tourist sites (though I did take a boat tour, more for the hour of sitting than anything else!). For me, this weekend was all about sewing and running, my two favourite pasttimes! I flew in Saturday morning and fellow sewing blogger Lauriana met me at the station to drive to the legendary Kantje Boord.

If you’re not familiar with Kantje Boord (and let’s be fair, their website is appalling), it’s a specialty lingerie haberdashery and fabric store, and is pretty much the only one of its kind in the world as far as I know. But it’s pretty far out of town, well away from the usual public transport, so I was very grateful to be driven there and give my legs a rest!

I’d heard stories about Kantje Boord, and I was not disappointed! It’s a tiny shop, but it’s stacked floor to ceiling with everything lingerie, lace, and elastic you could possibly imagine, and in every colour of the rainbow.

There must’ve been several hundred different kits (with everything you need to make a bra and panties in matching colours), but I decided what I’d rather make is another Ruby Slip, but in camisole length, with matching panties, so I instead focused on the wide laces, of which there must’ve been 3-4 times as many as the kits! Once I settled on a lace, I then crawled around the floor to get matching picot lingerie elastics to match it and my fabric swatches I’d brought from home.

So here’s what I bought! It might’ve been a bit more than I pledged, but I stayed away from the tempting Wall of Crazy Lycra, and only bought pieces that matched what I already owned!

Lingerie sewing supplies inventory

In advance of visiting Kantje Boord with Lauriana this weekend while I’m in Amsterdam to run the marathon, I thought it’d be a good idea to take a full inventory of my lingerie sewing supplies so I could see what I had vs what I needed, and hopefully not make duplicate purchases.

Oh. my. god. I really don’t think of myself as a “stasher” – I try to sew what I’ve got and keep it all fitting within the confines of my tiny sewing room, but I seriously have a ridiculous amount of lingerie supplies, and I hadn’t even realised it, because it was all stored in about four different places.

As a confession, here’s what I’ve got:

Elastics:

  • Black picot edge
  • Black ridge edge
  • Round stretch cord (white & black)
  • Medium grey picot edge

Temporary sewing

While our boat is in drydock for maintenance, we’re temporarily living on a very kind neighbour’s boat. Packing for a month (though possibly 2 weeks) was a challenge in itself, as you want to to give yourself choices (in clothing, entertainment, comforts, and cooking), but yet you’ve still got to physically move everything, so you don’t want to overpack, either.

I brought the bare minimum of sewing supplies, which for me means my JL Mini sewing machine, which is great for travel and beginners alike (speaking of, I have a friend who’s selling her identical red JL Mini as she’s upgraded to a fuller-featured machine. If anyone’s interested in buying it from her for £30, please leave a comment and I’ll put you in touch!).

I also brought a few patterns and the fabrics to go with them, and I set up a temporary sewing station in the bedroom we’re staying in:

I thought it was quite amusing that the only place in the boat that was suitable for sitting and sewing was a pretty dressing table, and my boudoir sewing station inspired me to start one of my transported projects last weekend – another Ruby Slip!

My first Ruby Slip was seafoam green with brick red lace and I loved it so much that I knew I’d be making another. If you missed the discussion then, Sherry offered a free pdf pattern and fantastic photo tutorials, which I highly recommend, even for beginners, as it’s beautiful and quite easy to sew (especially if you choose a thin cotton lawn).

To match my sewing station, I set up a pressing station in the kitchen, with a travel iron and mini ironing board which live on the boat.

Great basic – grey flannel trousers

As I mentioned last week, I got gifted some wonderful grey flannel from Claire (however did she know I like grey? ha!). It’s so soft and lovely that initially I thought it should become a dress, but then realised I’m likely to get much more wear out of a really chic, comfortable pair of dress trousers.

I had just received the January edition of Burda magazine and so these jumped out at me – #122 (also now available as a pdf download if you missed this issue).

There’s nothing particularly earth-shattering about this design, but I just thought it looked nicely versatile, and something I could wear to business meetings as well as just team with a teeshirt if I fancied it. These also have the illustrated instructions for this issue, but I could sew trousers blindfolded by this point, so the instructions didn’t make much difference to me.

I did notice, however, that they do the particularly dumb construction technique of tucking one leg inside the other and sewing the crotch seam last – this makes NO SENSE to me, as it means you can’t check the fit until you’re 95% done. Whereas if you do the outer seams last, you can pin and adjust the fit in the thighs and hip before you sew it up…

These photos were taken after sitting in a car, then sitting through a big Sunday roast so there are more wrinkles here than I usually have! The fit on these feels a bit closer than with most Burda trouser patterns I’ve sewn, but it also might just be because I haven’t sewn trousers in a non-stretch fabric in a while.

Upcoming January sewing

I’ve finally emerged from the craptacular flu (which then turned into bronchitis) that I’ve been under since Dec 28 – thank you for all your well wishes! For me, it really feels like the new year, 16 days late!

The Ruby Slip was my first garment of 2012, but my second and third aren’t far away…

Grey flannel trousers

Just before Christmas, I met up with Claire for lunch and she gifted me a massive length of wonderful dark grey flannel. It’s so soft and lovely that initially I thought a dress, but then realised I’m likely to get much more wear out of a really chic, comfortable pair of dress trousers. So on Friday night I traced and cut Burda Jan 12 #122, mostly because the issue was handy, but also because they looked to be a great basic. These have the illustrated instructions for this issue, but I could sew trousers blindfolded by this point, so the instructions didn’t make much difference to me.

I sewed this on and off over the weekend and nearly completed these despite hardly being at home. As a nice tie-in to my previous garment, the pockets, fly underlap, and waistband lining are all done in the pale green silk leftover from my Ruby Slip.

A seafoam green Ruby Slip (and matching panties)

The Ruby Slip is a free pdf pattern and comprehensive set of tutorials over at Pattern Scissors Cloth, and as soon as I saw it, I knew it was just the most perfect pattern ever for me and I had to sew it ASAP!

I had 2m of seafoam green silk in my stash that I’d bought at Bhopal Fabric on Brick Lane over the summer (at £6/m), so I took a swatch of that along with me to MacCulloch and Wallis just before Christmas to buy lace specifically for this. Their lace selection isn’t great, but I totally fell in love with this stretch lace, made up of seafoam green, grey, and brick-red flowers, and it was the required 18cm for the pattern. It was pretty eye wateringly-expensive at £14/m, but I ended up with a silk matching lingerie set for £40 exactly, so I think the economics of my decision were sound.

Sherry has done an incredible job going through all the ins and outs of lace cutting, bias silk sewing, how to do an FBA, etc, but I did get a surprise when I found that 18cm lace is not wide enough for the side front:

Since I went out and bought the lace specifically for this, I was a little annoyed, but I was also feeling flu-ish so I sat down with my copy of Bridal Couture and hand-pieced some lace from my scraps to make up the missing corner. It involved a ton of tiny hand stitches in both seafoam and brick to get everything to match seamlessly, but I’m pleased with the end result (she’s since posted some ways of dealing with narrow lace).

I also wanted to demonstrate how much you need to pay attention which cutting lace. I was paying heed to all of the scallops in order to get them in join up nicely at the seams, but I totally didn’t see that my motif was off at first. Happily, I had enough to re-cut that piece to have a nicer join over the seam (seen on the right).

Right, all that aside, and let’s see some finished photos! But, er, not modeled on me since there’s see-through lace and I’m not an exhibitionist. So you’ll just have to take my word that I squealed with delight when I first tried this on, because the fit is just perfect! The bias skirt really just hugs my curves without being tight, and everything just fits like it was meant to be. I made the “short” version, and the hem lies about 3-4 inches above the knee, which is perfect for me.