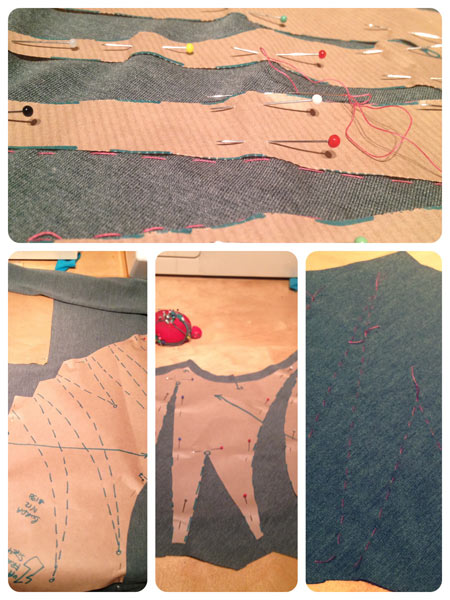
How to trace a pattern

I often see other sewers complain about tracing patterns from magazines like Burda World of Fashion, Knip Mode, or Patrones, and I thought I’d share my method for tracing patterns. I don’t have a big window, and carbon paper is just way too messy for me, so I’ve gradually come up with this method and it’s quick and easy enough that I trace out all my patterns this way – even the tissue envelope patterns.

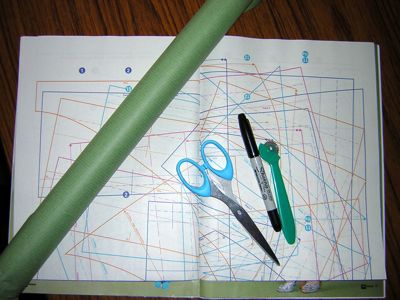
Step 1 – Gather your materials

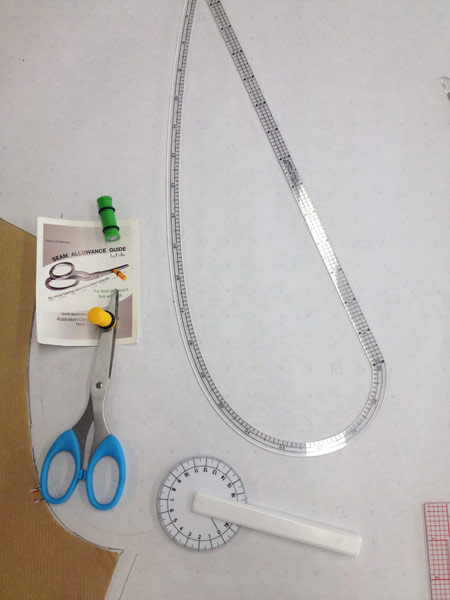
You’ll need a big roll of paper – I buy a big roll of (usually brown) craft paper from Staples, but you can also use rolls from the post office or doctor’s surgery paper or anything else similar. You’ll also need a serrated tracing wheel (found in haberdashery shops), a marker pen, a pair of scissors, and a few weighty objects to keep the layers from slipping around (not shown).

Patterns To Trace

Recently I’ve been doing more batch tracing rather than tracing one pattern, sewing it up, then tracing the next. I find my sewing bottleneck is often in the tracing step (even though it doesn’t take much time), so by doing a bunch at once I can always have something on the go to work on in the mornings and evenings.

I’ve been mentally matching up my patterns to fabrics in my stash and tracing an awful lot the last few nights. Here’s what I’ve got coming up in the next few weeks, though you can see my plans have had to change somewhat to focus more on comfortable knits…

Honing in on a jeans pattern

Even though I finally finished my pink trousers and lace teeshirt I mentioned last week, it’s been so hot and sweaty that I haven’t quite managed to do a photoshoot for them yet. Everything’s written so as soon as I do, you’ll get to see how great they are, honest!

I also managed to cut out a Kwik Sew exercise top, but not start sewing it yet, but what I really wanted to talk about today is the ongoing process in deciding which jeans pattern to use as a match for some heavyweight, non-stretch denim in my stash. So when I say that I’m “always thinking two projects ahead”, you now know it’s the truth!

If you remember back to my Spring Sewing Ideas, I had two different KnipMode jeans patterns that I thought I might use:

However, I found out soon after that the 2012 KnipMode one was for stretch wovens, which dis-counted it for this particular bout of jeans sewing.

The 2005 one looked very promising, but when I made a muslin of it the look was not good – ill-fitting in the waist and hips and way too wide in the legs. I’m sure I could fix it with plenty of time and patience, but with such an enormous pattern stash it just wasn’t worth pursuing further!

So I went back to the drawing board, otherwise known as my online pattern catalogue, and had a look through all the magazine issues I’d tagged “jeans”. This was a lot! So as I flipped through, I took screenshot segments of the ones I liked the look of, and renamed these files with the brand and pattern number, and shoved them in a special folder.

Pattern Magic Stretch Fabrics course at Morley College

Some of you may remember that last year I took a course at Morley College on Pattern Magic 2 (my first actual sewing class, believe it or not!) and it was so interesting, useful, and inspiring that I just had to take the course on the third book, Pattern Magic Stretch Fabrics. I booked this something like 9 months in advance, I was that excited to take it!

The first two books are based on woven slopers, but since this third one is all for knits, I used my own knit sloper instead of the book’s – I’m rather proud of this bit of forward-thinking! I also got to show off my pattern drafting gadgets plus it was great to see so many familiar faces and meet new ones, too (hi Clover & Ingrid!!). For the second class though, Claire had taken the initiative to digitally grade up the book’s blocks to larger, more standard Western sizes! She says she’s going to share these on her site very soon, so keep an eye over there if you want a short-cut to a bigger knit block.

Over the course of two consecutive Saturdays, we drafted three designs from the book (chosen by our amazing tutor, Moni), and a fourth of our choice, plus a bit of time at the end to sew up a sample so we got to see the range in real life.

Here you can see me & Claire from the first Saturday! (I’m totally brown-nosing by wearing a design from the second Pattern Magic book!)

The first design we all drafted was “Crescent Moon“, essentially a giant donut that you wear. It’s so avant-garde that it doesn’t even use a knit sloper, just circles!

This did look a bit better once we got out a smaller, female mannequin, but it’s still not something I’m finding particularly wearable.

The second design we all drafted was “Sharp & Snappy“, which I dubbed “the stegosaurus”. The gist here is that you shift the side seams forward and add triangular points in the seam line.

Pattern drafting gadgets (plus discount code!)

I had the final instalment of my Pattern Magic course at Morley College over the weekend (more on that later this week!), and since the majority of the class is in pattern drafting, it became apparent to me that I’ve got three pattern drafting gadgets in my arsenal that aren’t widely known, but that I consider to be essential!

On the left is the Seam Allowance Guide, little magnets which snap onto the side of your scissors to help you cut an even distance away from your line. I usually use this when cutting my fabric when using patterns that don’t have seam allowances at all, my on my course it was very helpful when cutting out the final pattern when I didn’t want to draw the seam allowances in. I got mine for review a while back but you can buy yours here.

On the bottom – I don’t know the technical name for this, but I call it my “pizza wheel measurer”. It’s a little wheel marked in centimetres which allows you to measure curves really easily. I use it most often when matching up seam lengths between sleeve caps and armscyes, but there are a number of occasions in the Pattern Magic books where you need to ensure two curved seam lines are the same length.Claire posted instructions on how to buy these from Japan a while back.

On the right – The newest member of my pattern drafting team is the SA Curve ruler – a narrow ruler with one straight edge and one curved edge. It comes in two widths – 5/8” (1.5cm) or 3/8” (1cm) and the idea is that you place the ruler along your seam line and then just trace the other side of it, et voilà! Your seam allowance is added on.

Book Review: Patternmaking for Underwear Design, by Kristina Shin PhD

You’ve heard me mention this book a few times as I’ve been experimenting with various drafts, but I felt it deserved a full review because, frankly, I’m a little obsessed with it right now. My mom surprised me with this when I was ill with shingles and the subsequent nerve damage pain, and it gave me something to focus on right as I was in the midst of my last bout of lingerie sewing.

It’s “Patternmaking for Underwear Design”, by Kristina Shin, PhD, and here’s a (pretty bad) shot I took of it’s cover:

It’s primarily a book for drafting your own bras and lingerie (but much more, too), and the biggest difference I’ve seen here in that these bra drafts all start with the underwire shape, and build from there. Every other bra draft I’ve seen starts with a bodice sloper, which is then adapted into a bra shape. The approach taken here makes a lot more sense to me for getting an accurate fit, since there’s so much variation in breast shape and distribution for women who even wear the same size bodice. As anyone knows who’s ever sewn a bra, finding the right size underwire is absolutely key, so it really seems right here to use that as a starting point. And it helps that most women can make a small incision in a well-fitting bra and just trace off one they know fits them!

There’s not really any construction or sewing instructions included in this book, but there are a few pages at the beginning with stuff like tips on cutting lace…

…and the wide variety of bra backs you can use once you’ve got your basic draft sorted out…

…plus several pages of various tables of measurements for different sizes, and exactly what to measure, both for the breasts and the rest of the body.

Here’s an example page from the leggings draft so you can see the style of instructions and diagrams. I personally found these easier to follow than Metric Pattern Cutting and WAY easier than any of the Pattern Magic books!

Vintage wiggle dress – pattern notes

My latest project is this vintage sheath dress from the November Burda magazine (which you can purchase as a pdf here if you missed the magazine)!

It’s a reprint of an original pattern Burda printed in 1956, and one of my favourite running features that Burda magazine have been doing this year. Since the company’s had a very long history, it makes sense that they should look into their archives, dust off a few gems, grade up the sizing to their usual modern range, and translate the instructions!

Contrary to popular belief, this particular one is not a maternity dress, despite the fact that the model clearly looks like she’s “showing”. I can assure you that I do not look pregnant in it one bit, so let’s move on with the catty remarks…

In any case, I finished this one on Sunday night, but considering that it gets dark at 4pm here now, I won’t be able to do a photoshoot until this weekend, meaning you won’t see it on me until next week. By which time I’ll have probably forgotten all the construction details, boo!

So by way of a reminder, I thought I’d type up my thoughts now, then you’ll see the finished design next week. So the “Tell”, then the “Show”!

1. The bodice has seven monster, curved darts, all of which needed to be accurately marked onto the fabric. If you have carbon paper, I suggest you make good use of it, but for me, I remove the inside of the darts with scissors, then thread trace each dart with silk basting thread so I can see it on both sides. Then repeat for the other bodice piece. This took a few evenings, but it was important to get them right, as it’s the focus of the entire dress!

Sewing book review: Pattern Magic 3 – now in English!

I don’t buy sewing books very often these days, usually preferring to get my information and inspiration from the internet and sewing pattern magazines, but I’ve found so much inspiration from the Japanese design schools lately that I just can’t say no when these are translated into English.

If you recall, I reviewed the first two Pattern Magic books here, and then, just recently the first Drape Drape book was also released in English (with the second coming out later this year).

Drape Drape uses included patterns which you trace off and sew, but the Pattern Magic books all rely on instructions for altering your existing sloper, so they can work for pretty much any size or shape person.

The big difference in this third book is that all the patterns here are designed for stretch fabrics, which adds a whole new level of fun! But of course, this doesn’t mean you can’t use stretch fabrics for the designs in the first two books – I’ve already made the flip-turned top twice as teeshirts, though I did have a great boost in understanding the Pattern Magic instructions on the Morley College “Pattern Magic” course I took earlier this year (I’m eagerly awaiting the new course guide so I can sign up for the rumoured class on this new book next year!).

So enough intro, let’s have a look at some of the wonderful (and weird!) designs in this instalment!

Hooray for the Vogue 1280 DKNY sheath dress pattern!

Even though I live in London, I grew up in America, and my family all still live there. A week or two ago, my mom saw there was a pattern sale coming up and very kindly offered to buy me a few if I wanted! There were two Vogue patterns on my Wish List – one was a Michael Kors knit dress that’s now OOP (and her Hancock’s didn’t still have it), but she was able to buy me one of the new DKNY Vogue patterns I was after, plus ship it to me, all for less than half the price we pay for Vogues in the UK on sale!

(Ever wonder what sad souls pay the full list price printed on envelope patterns? Yeah, that’s us. Little wonder I mostly sew with pattern magazines!)

So Vogue 1280 arrived in the post yesterday, and I immediately set about devouring the instructions and construction details of this.

It’s a really interesting, asymmetrical knit sheath dress with a characteristic (for DKNY) lack of side seams, so there’s a lot going on here!

Here’s a better shot of the tech drawing from the envelope. On Vogue’s site, the tech drawing is really too small to see that nearly all the seams are lapped, with a raw-edged piece of trim inserted, and then double-stitched (hello, coverstitch!) on top.

Morphing the Manequim sweater pattern to my size

If you remember from earlier in the week, my next project is to make this collared sweater from the June 2011 Manequim magazine:

Since the pattern is only in one size, “Small”, my strategy was to take an existing long sleeved teeshirt pattern that I know fits me well, trace that, then trace the neckline area from the Manequim pattern overlaid onto it and morph the two together. For simplicity’s sake, I wanted to keep the collar piece as unaltered as possible.

Here’s that wonderful diagram again showing how the Manequim pattern fits together, so we all have an idea in our head of what we’re aiming towards:

While overlaying the Manequim pattern onto mine, I wasn’t quite sure what I should use as the “frame of reference” to align the two patterns together – should I use the Centre Front & Centre Back? Or the shoulder seam/armscye corner?

In the end, it turned out that sorting out the Back first was the key to making the bigger changes on the Front piece work, since the Back of my teeshirt and the Back of this pattern were much more similar.


I’ve shaded my final pattern shapes in blue here to try to make it clearer. The original teeshirt pattern is (mostly) at the cut edge of the paper. Ignore the red lines – they were misaligned tracings!