Dutch sewing pattern magazine roundup

A few weeks ago J and I took a long weekend away in Amsterdam, but the majority of these patterns actually came from a different trip he’d made for work a few weeks earlier. It turns out that the newsagent inside Rotterdam station is a haven of sewing pattern magazines, who knew?? So rather than do a post on each of these, I thought I’d pull out my highlights, and take the chance again to explain how accessible the pattern sheets and instructions are for non-Dutch speakers…

The #sewdots Falda jacket

Rosie (of DIY Couture fame) created the “Sew Dots, Raise Lots” campaign for the month of October to raise money for the RNIB (Royal National Institute Of Blind People). The premise was simple – sew something with polka dots (because it looks like Braille!), donate to the RNIB, and share on social media with the #sewdots hashtag to be in the running for a huge prize mountain.

I’m not able to participate in every sewing initiative that comes along, but I knew I wanted to be a part of this one, because sight loss is something that’s affected people I love. For pretty much my entire childhood, my grandmother was legally blind from cataracts and glaucoma and I saw how her lack of eyesight isolated her from everything she used to love (like knitting and her independence). More recently, my Dad has suffered from Macular Degeneration, enduring years of regular injections directly into his eyeballs (!!) in order to try and slow the progression of the disease and retain his ability to still at least have some peripheral vision. I’ve also worked closely with the Blind Abilities community in my previous spoken word audio career, and tried to make our service and apps welcoming for the visually impaired. If you’ve got an Apple device, go ahead and turn on VoiceOver for a few minutes and try to navigate through your favourite apps as a visually impaired user would (but they do it way, way faster!)

The reversible disco jacket

I don’t often sew for James (preferring to fill my own wardrobe instead!), but every now and then he either sees something online that he’ll take inspiration from, or have a fully formed idea in mind that he’d like me to bring into reality. So this one is another fantasy jacket, this time modeled heavily on Betabrand’s reversible smoking jacket.

When we were in Paris in March, he bought a wonderful wonderful wool/poly blend corduroy at the Tissues Dreyfuss Coupons shop for €10 total (a complete bargain!) as well as some red chinese brocade to use for the other side.

I started sewing this when we were in drydock in April/May, then I stalled at the bound buttonhole stage since my little red machine isn’t great for precision jobs (no speed control!). Then the pressure was off during summer, but the cooler weather meant I really did want to finish it for him!

Even better – James surprised me buy buying Betabrand’s “open source” disco fabric, so now the jacket changed slightly in that the reverse will be PURE DISCONIUM!

What I’ve made here is the ultimate day-to-night jacket!


(Thank you to Kerry for the photo on the right!)

I started with his last fantasy jacket as the pattern base (which, in turn, started life as Burda 10/2008 #134) since it fit him really well, then James had a bunch of style changes to make to this one:

James's fantasy jacket

I’ve been calling this James’s “fantasy jacket” because he’s asked me to recreate a beloved unlined, simple, waterproof jacket that was stolen from a pub on the night he met me all those years ago.

He recalled it from memory while I attempted to create an accurate tech drawing, and then once that was agreed, I compared this against my vast pattern magazine archive (made much easier since I started tagging my At a Glance scans online, so I just had to shuffle through those issues tagged “menswear”!).

I decided that BWOF 10/08 #134 was a pretty good starting point for what James wanted, and I went from there. The muslin went well, so around Thanksgiving I started on the final jacket, made from a very cool laminated linen from Mood in NYC, with bias binding made from some dark red and black tie silk bought in Dublin three years ago.

How to sew welt pockets

It may be FREEZING in London, but the heat is on for me to sew James’s fantasy jacket in time for his birthday on Saturday!

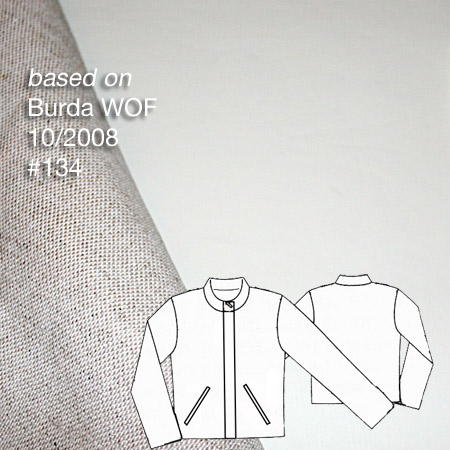
I’m calling it his “fantasy jacket” because he’s asked me to recreated a beloved unlined, simple, waterproof jacket that was stolen from a pub on the night he met me. So he recalled it from memory while I attempted to create an accurate tech drawing. Then I compared this against my vast pattern magazine archive and decided that BWOF 10/08 #134 minus all the bells and whistles plus a few different whistles and bells was the best starting point. The muslin went well, so this weekend I started on the final jacket, made from a very cool laminated linen from Mood in NYC, with bias binding made from some dark red and black tie silk bought in Dublin three years ago.

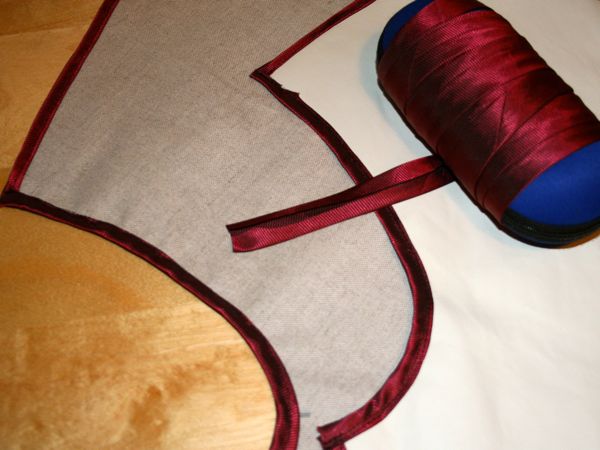
The rubberised coating on the fabric means any and all pin holes show, so I needed to treat it like leather – pattern weights and rotary cutter for the pieces, and since it’s unlined, I also needed to create metres upon metres of bias binding for the exposed edges. I used a continuous bias binding method for the first time ever and it was very quick, though not very intuitive.

(I wrapped the binding around a sunglasses case to avoid creases. And because it was handy. Let’s face it – I’m not going to be needing the sunglasses any time soon!)

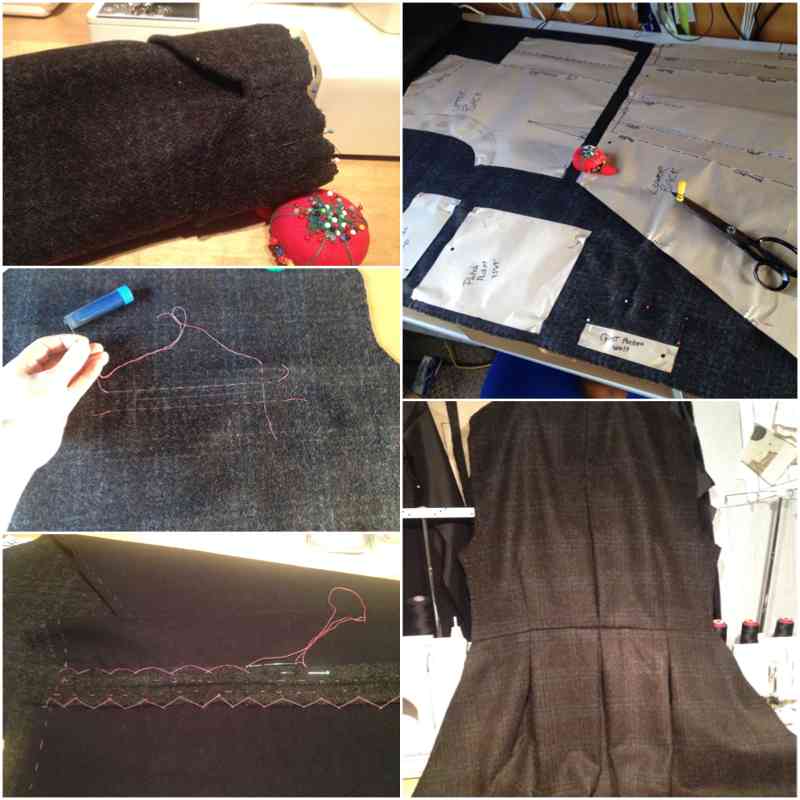
After binding most of the edges, I then set to work on the front welt pockets, which were rather tricky on a fabric that requires a press cloth (I’m paranoid that the laminating will melt!) and can only be basted where it will never be seen. So I thought I’d document the process and give you all a little welt pocket tutorial.

This is also exactly how I do bound buttonholes, but because the scale is much larger here, it’s easier to try welt pockets first to get the technique down and then just do the same thing on a smaller scale for buttons once you get the hang of it.

How to sew a double welt pocket

My pockets here are 7 inches long (6” is standard but I wanted to make sure his big man paws would fit in), and the opening is a total of 2cm wide (1cm on either side of the centre opening line). So the welts I cut out were 4cm wide (folded in half, they’re 2cm wide so straddle the stitching line nicely), and 8 inches long (so I get some overlap at the ends). You’ll need two welts per pocket. I folded each of these lengthwise and machine basted close to the cut edges to keep them together. If your fabric frays or shifts in anyway, you may want to interface the welt pieces in addition to the area around the pocket opening.

Step 1
Hand baste the pocket edges and central line. When you’re basting (in general), never turn a corner with your hand stitches, but leave the tails free at the corners. Also, you should extend the short edges here two centimeters or so beyond the long lines. I haven’t here because the needle holes would show!

A green cropped blazer

I’ve got a wedding rapidly approaching, and for once in my life, I actually bought a dress instead of sewing it (ok, technically James bought it for me when we were in France!). But I couldn’t let this occasion go by without sewing something so I decided I wanted a little cropped jacket to go along with it. Luckily there are a lot of colours in the dress to pick out, and a good friend gifted me this green, ex-Karen Millen piqué specifically for this purpose!

I sifted through my pattern magazine archive (made easier since I’ve got each issue overview online) and decided on a sharp little cropped blazer pattern from the September 2013 Manequim magazine (curiously I’d overlooked it when I reviewed the issue!).

I love that this jacket is short in the body so it won’t interrupt the full skirt on my dress, has got 3/4 length sleeves which are so nice for summer evenings, and best of all – a shawl collar with little tuxedo styling at the bottom. There’s no front closure, either, so it’s a nice one to just slip on over the dress and not have it look like it should be buttoned or something.

Many of you ask how I deal with Manequim patterns that aren’t in my size – the short answer is, I don’t. I’ve got so freaking many issues and patterns to choose from that most of the ones I want to sew either either in a 44 or 42 (this one’s a 44), or if they are significantly smaller, I just graft the interesting features onto an existing base pattern that fits me.

The Sherlock coat

Sewing a coat is always a big accomplishment, but this coat in particular has been a long time in the making. I first told James I’d finally make him a coat like Benedict Cumberbatch wears in BBC’s “Sherlock” for his birthday back in early December. I drafted up a pattern using the details provided in this livejournal post, then made a muslin for him later that month. With only a few tweaks needed for fit and style (I made the lapels too big, for starters!), I then moved on to purchasing the wool coating, cotton flannel underlining, and black acetate lining.

But this is also where the first delay came in, as he wanted a black wool coating with faint blue and brown checks from Crescent Trading, who turned out to be closed over the full Christmas period, when I was hoping to get a lot of the work done. All of the above are detailed more
in this “progress report” post from January.

I then had more hurdles involving the hem bubbling (which meant I had to baste it in place, flip it back wrong-side out, handstitch, re-press, etc), waiting for some woman on Etsy to make more replica buttons (which we finally gave up on and just made our own with gold enamel paint), and getting the right upholstery thread to do all the buttonholes.

But it’s finished, it looks fantastic on James, and the proportions are really flattering on him, too! So the lengthy making process shall soon fade away in the light of the finished coat. He definitely prefers it open (as dos Sherlock himself), but it can be buttoned up in the coldest of days, too:

It’s a very warm coat, having underlined the body and sleeves in flannel, a trick I picked up in previous coats to stop the wind.

I can’t take the credit for these, as James was having fun with photoshoot ideas!

The Sherlock coat – progress report

I mentioned briefly back in December that, for James’s birthday, I gave him the promise of a custom-made coat in the style of the one Benedict Cumberbatch wears in Sherlock. Or as it will henceforth be known, “the Sherlock coat”.

A few others online have made this coat (including a few FehrTrade readers, hello!!), but I found the most helpful resource to be this livejournal entry from a lady who sketched and measured a lot of the details after analysing screen grabs. This was a big help in taking James’s TNT short jacket pattern and adapting it to look more like the coat on screen!

I first made an approximation on his paper pattern and sewed up a muslin. From this the only real fitting problems were that the upper back was too tight, and the Centre Front needed to be shifted by about an inch, but it was otherwise fine. I guessed a bit wrong on the collar and lapel shape though, but it was fairly easy to just draw a nicer shape onto the muslin itself and transfer it to the pattern.

Once the muslin was settled, I then bought the wool coating (delayed a bit as Crescent Trading were closed over the holidays) – not the exact black and grey small houndstooth used in the original (simply because I couldn’t find any locally), but instead a black/grey/brown check which still had the same feel. I also bought the black acetate lining at the same time, but the black cotton flannel for underlining came from Minerva.

I then settled in for the mammoth task of cutting out all the pieces in wool, underlining, interfacing, and lining, then fusing the crap out of everything that needed interfacing. With two patch pockets (and flaps), plus two welt pockets, two back belt pieces, sleeve cuffs, and a collar, (not to mention facings!), there was a good day taken up just by fusing alone!

Let the disco begin!

Because I’m a good wife, I promised James I’d make his reversible smoking jacket after I’d finished my peplum top (photos coming next week, sorry – it’s been impossible to organise a photoshoot around both our social schedules!). This week has been rather busy, even by our standards, but I did get two evenings to work on it, and so far I’ve completed the entire corduroy shell (including bound buttonholes and no less than three welt pockets!) and moved on to the interior. Or, because this is a reversible jacket, I suppose it’s just “the other side”.

The other, disco side.

If you recall this is Betabrand’s disco fabric and it seriously is as bright and loud as the photos on their site suggest. I had to cut it with the black side facing out just so I wouldn’t go dizzy cutting it!

Thank god it's finally 2010!!

The worst year of my life is finally over, hurrah! Celebrate!! Woo! I always try to live each year so that it’s better than the one before, and I don’t think I’ll have to spend much energy to make 2010 a success by that yardstick! Still, my cathartic sewing output hasn’t been too bad, especially considering I spent a full 8 weeks/2 months in a hospital bed!

(Click the composite photo to zoom in, and have a look in the Gallery to read more about any of them. Except the last few, which you’ll see in greater detail next week.)

Here’s 2007’s and 2008’s roundups, for comparison.

Let’s find some highlights in what was an otherwise incredibly sh*tty, sh*tty year….