Happy 2015! (My year in review)

As I do every year, I like to spend the first of a new year to take the opportunity to look back on what I’ve sewn in the previous year. So without further ado, here’s a visual reminder of 2014!
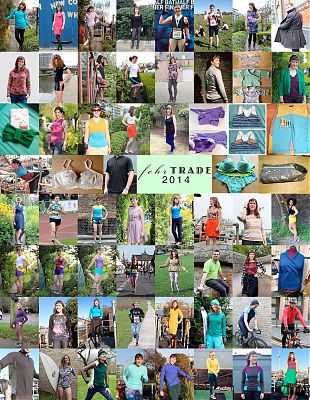

Click the image to see it better, or right-click here to see it in a new tab to get a better look!

Tip: If you’d like to skim back through the posts for the above projects, you can click Gallery in the upper left menu, which will only show you finished projects, without all the magazine reviews and in-progress reports getting in the way!

The Year in Stats

In terms of pattern companies used this year, I made:

  • 29 FehrTrade patterns (no surprise, really!),
  • 7 Burda magazine (aka Burda Style),
  • 5 Self-drafted (including traced from RTW),
  • 4 KwikSew (well, the same one pattern four times!),
  • 3 Manequim magazine,
  • 3 Cake Patterns,
  • 2 Style Arc,
  • 2 Vogue,
  • 2 Orange Lingerie,
  • and 1 each from Simplicity, McCalls, ThriftyStitcher, Christine Jonson, Seamster, Named, Sinbad & Sailor, Drape Drape, House of Pinhiero, and Jalie.

By my count, I made: 31 tops, 19 trousers (including leggings & shorts),
5 dresses, 4 pieces of lingerie (bras, panties, slips, etc), 3 skirts, 3 jackets/coats/cardigans, and 4 bags. James also did well this year, being made a winter coat, 2 shirts, 2 cycling tops, and a dop-kit bag.

And I realise I’ve been sewing a lot of running gear but the total number even surprised me – 34 of the above were for running (though not all for me)!

The above may sound like a lot of sewing, but even this is only a fraction of what I’ve actually sewn – I couldn’t really include all the garments sewn for the Great British Sewing Bee, for example, or those made for custom clients (of which there’s been a LOT!), or for the book I’ve been working on, either. In all honesty, I think you could probably double the amount shown above and it’d be closer to the total output!

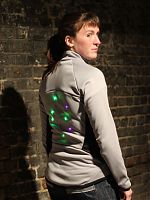
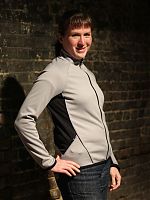
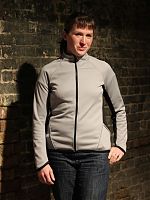
My light-up, twinkling running jacket – the sewing bit!

You heard all about the electronic components earlier this week, but the sewing of the jacket itself was in no straightforward, either! If you missed the video of the LEDs in action, have another look:

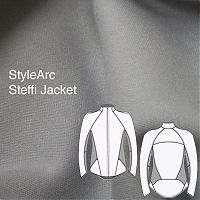
You might think, that, as a pattern designer for exercise wear, I might view other exercise patterns as competition. On the contrary – when I first saw the StyleArc Steffi jacket, my first thought was “Brilliant! Now I don’t have to draft it myself!”. I’ve got enough ideas in my head for patterns already, so I’d rather refer folks to other good patterns if I can rather than constantly reinvent the wheel.

This pattern was a birthday gift from my inlaws, and I was initially concerned because they’d bought me a size 10 instead of the 12 I’d asked for, but as it turned out this fits me really well anyway. It’s a smidge too tight in the chest for me to run in (my trainer has me focus on pulling my shoulder blades back to open up my chest for better breathing), but is utterly perfect as a warm-up, cool-down jacket, so hurrah for happy accidents!

I chose to do my colourblocking like it’s shown in the technical drawing – I used a grey/black sportshell as the main body, then I used the black reverse of this black/grey “budget” sportshell as the contrast panels. The main sportshell is really nice – a soft, technical jersey with a thin layer of fleece bonded to the inside – it feels really RTW and high quality. The budget one, well, lived up to its name. The grey side looks a bit naff, there’s no fleece, and the black side is just smooth like the other fabric’s grey exterior. So it was fine for my purposes here, but I wouldn’t recommend skimping if you want a similar jacket – go for the more expensive option and you won’t regret it.

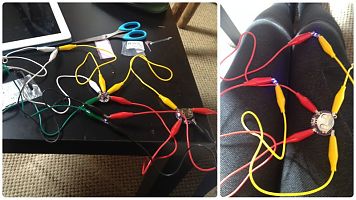
My light-up, twinkling running jacket – the electronics!

This is an epic jacket, and something I’ve been wanting to do for, ooh, 6-7 years at least. You see, I really liked the idea of wearable electronics, and clothes that do something and interact with their environment, so I started buying LilyPad components many years ago with the hopes of making something.

Then I realised that I know nothing about circuits and electronics, and it all seemed really confusing every time I tried to sit down and learn about it. Finally, I decided that I’d bring my suitcase of tricks (no really, I have a little yellow plastic “suitcase” with all my beginning circuitry stuff in it!) along to France on holiday and I’d sit down and teach myself how to do it then. And I actually did!

LilyPad is the sewable line of Arduino products, made especially for folks like us. They’re easy to attach onto clothes, and (apart from the batteries) are machine washable, too. For this jacket I used a LilyPad battery pack (I started with the Coin Cell one but it wasn’t quite enough power), a Lily Twinkle controller, a bunch of LEDs, and a spool of conductive thread.

I used a mix of the regular LilyPad LEDs and the Micro LEDs because that’s what I had – the micro green ones were much brighter than the bigger purple ones, but you can really only get about four loops of thread around each terminal of the micro ones, so if you need to connect it to more than two lines, go for a bigger one. The Twinkle controller is really just a tiny board with four connection spots for LEDs and makes them fade in and out randomly (though you can connect more than one LED to each spot & they’ll twinkle in unison). I wanted to make things easy for myself this time around so I left out any input sensors, though I do have an accelerometer in my stash…

I’d thought to bring along this “Fashioning Technology” book and between that and this Lilypad Twinkle tutorial, I pretty much taught myself how to make a simple circuit to do what I wanted. When I go to do my next project, I’ll need to read a few different chapters and watch some more tutorials, I’m sure!