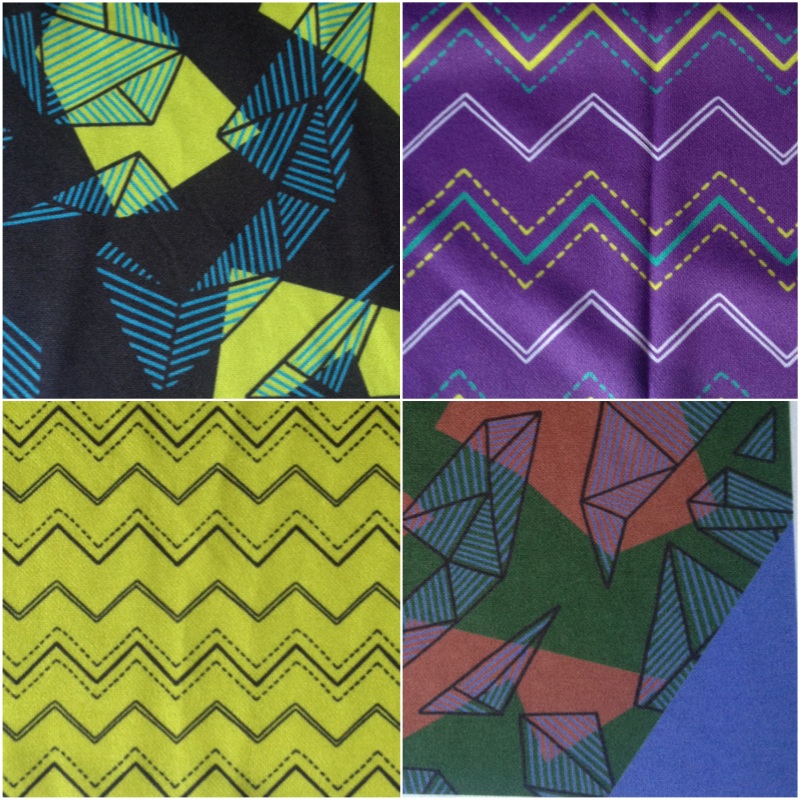
Design lines and ideas

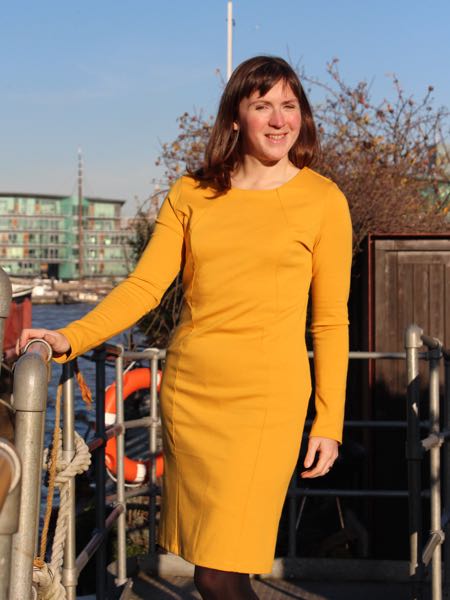
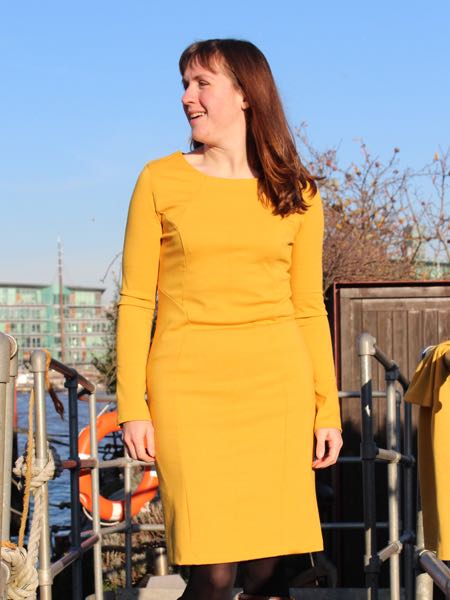
I know it’s a cliché to say so, but I’ve been very busy lately! So busy that there was no sewing activity whatsoever last weekend (though I did cut and fit an awful lot of insulation for the new boat bedroom, attended two out-of-town barbecues, and raced a new 10km PB in the weekend available to me!). In two weekends’ time I’ve got a friend’s wedding and ever since we were invited, I knew I wanted to apply a Pattern Magic technique onto a sheath dress for this occasion.

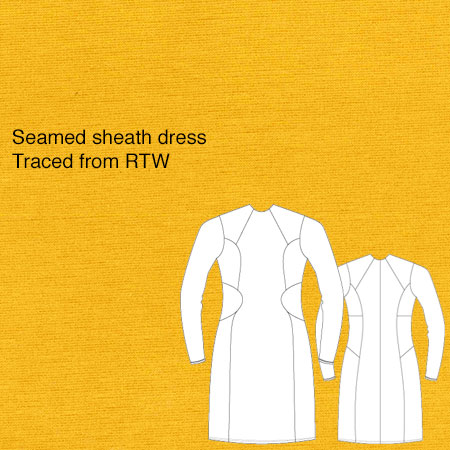
Overall, I was disappointed by the June Burda magazine, but I saw dress #129 and knew it’d be a great starting point since I know Burda’s dresses fit me very reliably (and I’ve already raised the waist by 1 inch to make it perfect).

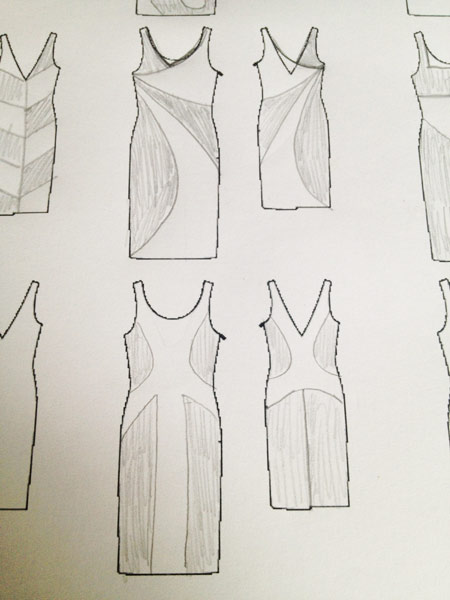
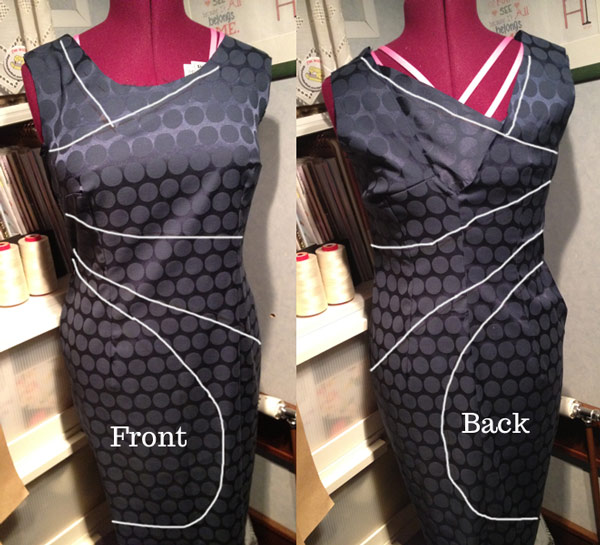
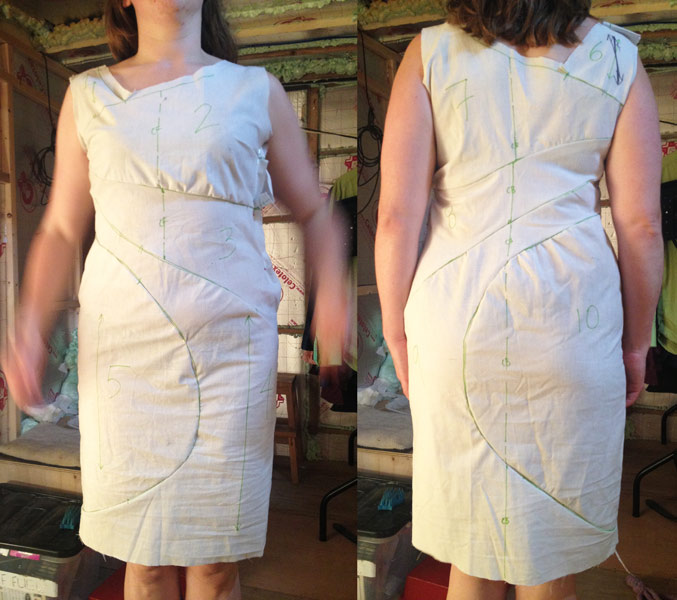
The technique I’m looking to apply here is one I learned on my Pattern Magic 2 course at Morley College, though it’s well documented in the second book, too. Essentially, you make a muslin of a basic block (in my case, I’m using this Burda pattern), draw design lines wherever you like, cut along those lines, and then release any lumps into the curved edges of the new pieces.

So thus far I’ve copied the tech drawing off Burda’s site, raised the neckline a bit, and removed all the darts in Photoshop (since mine will be incorporated into my new design lines anyway), then printed off a bunch of these empty tech drawings onto a sheet of paper.

Introducing… FehrTrade x Laurie King fabric designs!

By far the single biggest question I get with my exercise sewing patterns is “Where do I buy good fabric?”. Despite compiling a list of global stockists of exercise fabric, I totally get your frustration – it’s getting a lot easier to buy nice colours and quality wicking lycra, but prints are still difficult to get a hold of, and when you can, it’s often costly and difficult to match colours.

But what if you could buy just one yard of fabric and be able to sew up one garment with coordinating colours and stylish prints, and mix and match to make outfits that coordinate together, too?

I’m super pleased to announce that this is exactly what I and illustrator Laurie King have made happen! Laurie is an avid cyclist and dad to two small boys, and I’ve been a massive fan of his hand-drawn style since before he made that amazing couch on ITV’s The Cycle Show!

I’ve had this idea brewing for about 6 months now, but it took a design session with Laurie before the idea really came to life. Since I know the exact size and shape of all the pieces for my sewing patterns, I’ve created “zones” of print and colour on one yard of fabric using two of his prints in three different colourways. These prints are exclusively for your fabrics, too!! So there’s very little chance you’ll be exercising and catch someone across the room wearing the same thing!

The first collection is comprised of two prints – “Zigzag” and “Maps”, using three different colourways – “citrine/black”, “purple/citrine/teal”, and an “earthy” mix of forest green, slate blue, and muted red, which should be perfect for Fall and Winter. The idea is that we’ll be changing these up and releasing different designs a few times a year, too, so we’re open to ideas on colour combinations you’re loving!

Swirled lines sheath dress – 2nd muslin

Thanks very much for all your feedback on my post regarding the design lines for my upcoming sheath dress – I decided to go with the top design, and save the bottom one for some later colour blocking (maybe in ponte jersey?).

Once that was decided, I sewed up that basic Burda sheath dress (which fit me very well, as expected), then while it was on my dressform I drew rough design lines on to match. After the rough lines were on, I cleaned these up with French curves while the dress was lying flat (these photoshopped ones are just free-handed on top since my black lines on navy blue fabric were hard to see in the photo!)

I then cut apart the Burda muslin along my new lines, and cut into the curves a few times to release any bumps. I then transferred these altered pieces onto a second muslin to test that all my new curves matched up well:

A silver & linen dress – decisions and basting

Thank you all SO much for all the feedback on my pattern shortlist earlier this week. It’s so incredibly helpful to hear from others which have worked and which haven’t, and to get me thinking on what I most like to wear (and what I don’t!).

Since I tend to email commenters personally but not put my responses in the comments themselves, I thought it might be helpful to answer a few general questions from the comments. I’m not really seeing this as an overly dressy/posh/fussy dress – for me, the linen dress on its own would be something I’d wear to the office, out to lunch with friends, or out in town, and the motif I bought in Paris is just a sort of permanent necklace. I always overdress anyway, and I’m not envisioning this as anything “left for best” in the slightest! Believe me, there’s very little I keep aside and out of my daily rotation!

Nancy K suggested a tunic might be more wearable than a dress, but I had to admit to her that I really, really don’t feel comfortable wearing tunics. There’s just something about the awkward “too long for a top but too short for a dress” length plus too many layers that just makes me feel self conscious. Whereas I wear dresses and skirts almost continuously in summer (compounded by the fact that I don’t wear shorts)!

Finally, I decided against a bunch of lovely sheath dress patterns purely for linen/wrinkle reasons, and my thinking that these would probably have more horizontal wrinkles from sitting than full-skirted numbers. I’m debating whether I’ll underline this dress or not for that same reason, but I suppose it all depends on if I can find suitable cotton or silk lightweight fabric for a good price while we’re in France.

Enough with the commentary – I finally decided on dress #102 from the KnipMode 03/2010 supplement (one I didn’t even scan in my initial review! gasp!).

A linen & silver dress – ideas

London has gone super sunny and warm over the past few weeks, so my thoughts have turned to spring sewing and using up some treasures from my stash. Remember the silver chain and sequin motif I bought in Paris last summer? Well I still adore it, and I thought it’d be a great showpiece for a spring dress.

Since the motif is mounted on blue netting, I thought it’d be best to pick a similar coloured fabric for the dress, so that the little spots inside the design which can’t be trimmed away wouldn’t look too out of place. Luckily I’ve had this turquoise linen/rayon mix in my stash for a few years, so its day has come!

I thought it looked good next to the motif, but wow! it looks amazing when I actually pull some through underneath it!

Has anyone worked with motifs like this before? I’m guessing I just get silver lurex thread to match and take tiny stitches the whole way around and trim off the excess netting? Is an embroidery hoop useful (or necessary)? I’m hoping to get the piece cut out and ready to work on during our French road trip over Easter, with any luck.

The next step is figuring out which pattern I’m going to use. I used my usual method for sifting through my pattern magazines (like I did for my wedding gown and my latest winter coat) – since I’ve got all my At-a-glance pages scanned in an online gallery, I flip through them all looking for a suitable pattern, and when I find one, take a quick screenshot of that pattern (Shift-Apple-4 on Mac makes it really easy!), and rename the file to be the issue number so I can find where it came from.

Burda magazine Jan 2017

I think Burda Towers must’ve taken a break for the holidays or something because everyone I know received this issue really late for some reason! But better late than never to kick off a brand new year of Burda sewing patterns, and this one’s not only got the traditional January carnival costumes (and nary a “recycled water bottle lady” bonkers one in sight!) but also… activewear! 😝

Interview with Kelli from True Bias

I first heard about True Bias patterns when Kelli released her first pattern last year – the Hudson Pant were an indie sewing phenomenon, and it seemed I was about the only woman who hasn’t sewn a pair yet (and believe me, they’re still on my To Sew List for someday!). I’ve had the privilege of talking to Kelli to find out more about her sewing, aesthetics, and what’s up next, so read on to find out more about the lady behind the label… – melissa


Kelli in her Hudson Pant pattern

You kept a sewing blog for quite a few years before starting True Bias – what was the impetus for starting a pattern company?

Yes, I started my blog about 3 1/2 years ago. When I started it, I always knew that it would somehow turn into a business for me, I just wasn’t sure in what way. I was new to motherhood, having an identity crisis, and needed something to work towards. I was passionate about sewing and the community, so it made sense to focus my efforts there. I entertained the idea of a fabric store for awhile but it didn’t stick. I knew of a few independant pattern companies at the time and loved what they were doing. I had taken a couple of patternmaking and draping classes in college, but I knew that I didn’t have the skills yet to start a company. It wasn’t until after moving to NYC and starting classes at FIT that my confidence and abilities grew. My first pattern, the Hudson pant, was a huge leap of faith for me. And it was super slow at the beginning and scary. I wasn’t sure that this was all going to work, but it did and I am so glad.

What’s the single biggest lesson you learned so far?

Don’t worry about what other people are doing, just be true to yourself. This is SO hard though. The indie pattern market has become very saturated and we are all influenced by the same trends to one extent or another. This means there is going to be some overlap. There have been multiple times when I have seen a sneak peek on instagram of another designer’s pattern and I have had a total freakout because it looks similar to something I have been working on for months. It’s scary because you don’t want it to appear that you are copying, but in the end you have to be true to yourself and your own ideas. Like I said, it’s really hard though.

Surf to Summit Top – Four Winter Running versions

Phew! It’s been one heck of a few weeks! I’ve shown you all of the many different versions of the Surf to Summit Top pattern that I’ve made not only for myself, but also my athlete-models. So far you’ve seen versions for snowboarding and cycling, and surfing, but today’s versions are all for winter running.

One of the great things about this design are all the opportunities for colourblocking, and I wanted to play around on this version so you can really see the seamlines – plus I added an extra seam of my own on the shoulders! On the Front and Back, I used some forest green UA Cold Gear fabric (now long gone) from my stash. On the Side panels, I used some reflective fabric from The Rain Shed. A note about this fabric, though – I really like it, but it is not lycra as stated in the description – it’s much, much closer to the sort of textured fabric you find in technical race tees (like DriFit). For the sleeves I used some leopard-print lycra from UK Fabrics, but I didn’t have quite enough leftover from my leggings to fit the entire sleeve in, so I introduced a curved seamline and used some reflective fabric at the shoulder instead.

But let me introduce my athlete-model, Daniel. I’ve probably run more training miles with Daniel than anyone else on earth and he’s a great friend of mine, in additional to being a truly inspiring runner. Dan only started running a few years ago, and has truly embraced endurance running, going from running his ever first race (a 10k) to running his first 100km ultra this year, with a bunch of marathons thrown in for good measure. He’s even run the grueling Mont Blanc Marathon, and regularly passes runners half his age on Tuesday nights.

I made this men’s version of the Surf to Summit Top at the very end of the testing process, so it’s identical to the version you buy, and I especially like how this fits Dan in the waist and hips – this is exactly how I intended the men’s version to fit. It’s slim-fitting without being loose, but isn’t skin-tight, either. If you prefer your tops to fit differently, I’ve included instructions on how to alter the pattern to get the fit you want, as I discovered in testing that men are really polarised on how they like their exercise tops!

Mustard ponte seamed sheath dress

Like many of my most well-loved dresses, this one was quite a long time in the making. A few years back I’d bought a yellow ponte sheath dress from ASOS that had some amazing seamlines. I don’t often buy clothes anymore these days (preferring to spend my time sewing than fighting my way to the shops, or waiting days for an internet purchase that’s low quality or not quite right), but I really liked this dress, and wore it often despite the sleeves and hem being too short. Inevitably, the yellow also got dingey and pilled over time, but I still liked the overall design.

So I traced it! I literally just laid the dress over brown paper and ran a serrated tracing wheel over the different sections, leaving an impression underneath, just like how I trace patterns. I remember I traced James’s well-loved linen shirt at the same time, so it was a few months ago, and even though I had this mustard ponte in my stash for even longer, it took me a while to get around to sewing it up.

It may look like a complicated design, but it’s actually really quick to sew up on the overlocker, and only the back invisible zipper takes a little bit of sewing machine time.

Here you can see me holding the original dress, whilst wearing my copy!

All the things I loved about the original dress are present here – the figure-hugging design, the flowing, curved panels, the vibrant colour – but the sleeves are nice and long instead of “unintentional bracelet length”, and the hem doesn’t go scandalously short when I bend over!

My light-up, twinkling running jacket – the sewing bit!

You heard all about the electronic components earlier this week, but the sewing of the jacket itself was in no straightforward, either! If you missed the video of the LEDs in action, have another look:

You might think, that, as a pattern designer for exercise wear, I might view other exercise patterns as competition. On the contrary – when I first saw the StyleArc Steffi jacket, my first thought was “Brilliant! Now I don’t have to draft it myself!”. I’ve got enough ideas in my head for patterns already, so I’d rather refer folks to other good patterns if I can rather than constantly reinvent the wheel.

This pattern was a birthday gift from my inlaws, and I was initially concerned because they’d bought me a size 10 instead of the 12 I’d asked for, but as it turned out this fits me really well anyway. It’s a smidge too tight in the chest for me to run in (my trainer has me focus on pulling my shoulder blades back to open up my chest for better breathing), but is utterly perfect as a warm-up, cool-down jacket, so hurrah for happy accidents!

I chose to do my colourblocking like it’s shown in the technical drawing – I used a grey/black sportshell as the main body, then I used the black reverse of this black/grey “budget” sportshell as the contrast panels. The main sportshell is really nice – a soft, technical jersey with a thin layer of fleece bonded to the inside – it feels really RTW and high quality. The budget one, well, lived up to its name. The grey side looks a bit naff, there’s no fleece, and the black side is just smooth like the other fabric’s grey exterior. So it was fine for my purposes here, but I wouldn’t recommend skimping if you want a similar jacket – go for the more expensive option and you won’t regret it.