Go to content Go to navigation Go to highlighted projects Go to contact

Bridal bodice - Piping and basting

30 July 2010, 13:45

…in which I work with more piping than a plumber and more basting than a Thanksgiving dinner!

When I last checked in, I had cut and prepped all the pieces of the bodice, so it was now the point in my plan to sort out the piping if I was going to do so (and you’ve probably rightly concluded from the title that I did!). I had about 80cm of piping from the original dress’s waist seam, but I realised this wouldn’t be enough to pipe both sides of pieces #2 and #7 like I’d planned. So before I could do anything, I had to make some piping!

Luckily, the dress’s collar pieces were nice and long and on the bias, so this was a piece of cake. I cut four strips of 5cm wide and joined the edges together to make one long strip, then inserted my 2m of satin rattail and ran the whole thing through the sewing machine with the zipper foot.

But as I’ve already established, I can’t be making errant needle holes nor can I afford to use the seam ripper any more than what’s absolutely necessary, so in order to get the piping inserted perfectly on the first try, some hand basting was in order.

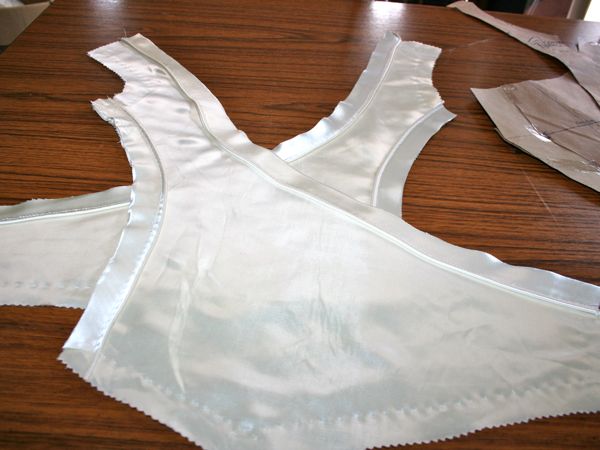
First, I basted the piping to one of the pieces, aligning the piping’s stitches with the basted seam lines:

And I did that for all four piped seams:

I made a test-run of a non-piped seam through the sewing machine just to test my confidence and to make the overall assembly a bit neater. Here’s pieces 9 & 10 joined and pressed:

So, confident that machine stitching was the ultimate end-game, I then placed the other piece on top of the piping and hand basted that on top, making sure its seamline was exactly aligned with the piece underneath. Only then did I finally run the whole lot through the sewing machine with the zipper foot, and pressing and clipping the allowances afterwards. So by the time these saw the machine, there were already four sets of hand basting here (each piece individually, then two lots for the piping!).

I don’t often sew with piping so I had forgotten what an utter joy it is to have really nicely piped seams. I’m utterly tickled with how these look – I just kept clapping my hands and giggling! And you can really see how nicely the netted sections look against the satin piping and plain sections, too!

Rather than move on and finish the bodice assembly, I thought it was better at this point to go back and do some tedious cleanup while the pieces were still relatively small. Bridal Couture says to catchstitch the seam allowances to the underlining to ensure they remain flat, especially on any curved princess seams where they tend to have a mind of their own. Since my dress is pretty much entirely curved seams, I’m just doing the lot.

And what a difference it makes! The inside is instantly looking neater, and this is something I can do easily while watching tv, so it’s easy to find time for (not that I watch much tv these days, but with True Blood and Mad Men in new seasons, it’s something I have to consider in my time management!!).

Next up: Attaching the last two pieces, sewing the side and shoulder seams, and catchstitching all of those seam allowances, too.

tags: , , ,

Comments:

  1. No wonder you were so happy, it looks fantastic! Must go home and try some piping…


    — Lizzy    Jul 30, 02:25 PM    #
  2. This is not a very sophisticated comment, but I just wanted to say how totally impressed I am by this project. Your dress looks amazing so far—keep on rockin!


    Joanie    Jul 30, 02:44 PM    #
  3. You’ve really gotten a lot done already. The catchstitching really does make a significant difference.


    Nancy k    Jul 30, 03:12 PM    #
  4. It is so cool watching this project unfold. Things are looking great and I’m so excited to see the final dress. :)


    amber    Jul 30, 05:05 PM    #
  5. Ooo… I love the story and all the work behind your dress! :)


    Angela    Jul 30, 06:04 PM    #
  6. This is coming along quite nicely. I enjoy watching you work on your projects.


    Mary in FL    Jul 30, 06:35 PM    #
  7. Wow, that looks great! It’s so much fun to watch this all come together. Thanks for letting us be a part of it.


    — Time4me    Jul 30, 06:42 PM    #
  8. This is looking beautiful already, and soooooo neat!

    What a lovely project and how wonderful to be able to reuse a piece of history like this.

    Good luck with the rest.

    I may have missed this in an earlier post, but what are you underlining it with?


    — Meg    Jul 30, 08:05 PM    #
  9. This is SO COOL! The net overlay looks even better than i imagined, and the piping enhances the curved seams perfectly! Who needs lace and bling? You’ve got it right here! And the flannel underlining makes so much sense – keeps everything very neat and smooth. I’ll have to remember that! Keep up the great work – we’re all cheering for you ;-).


    — M Kate    Jul 30, 09:02 PM    #
  10. Wow, the couture details are fabulous. Love it!


    — Dilliander    Jul 30, 10:43 PM    #
  11. A-fricken-mazing! Piping-yummy! Lining and catchstiching-magical! How exciting and rewarding. Glad to hear I’m not the only one who claps and cheers when a project comes together :)


    — JenL    Jul 31, 02:15 AM    #
  12. This dress is going to be so gorgeous inside and out. I dont know how you have the time to give us all the detail you do – but thanks!


    — Kim Hood    Jul 31, 07:35 PM    #
  13. Your bodice is just glorious! The piping is sublime.


    Robin    Aug 2, 01:26 AM    #
  14. Hi Melissa. I just wanted to leave a few lines to let you know how inspiring your hard work is to beginner sewers, such as myself! I’m putting a link to fehrtrade.com on my spot on the web so I can visit you again in the future. It looks like I will learn quite a bit from you (as well as being left in the dust! haha) Thank you for sharing your skills online. …your taste in fabric and design leaves quite a strong impression of your personality. As I was browsing your site, I kept thinking “Oh she’s got such an adorable flare!” and couldn’t wait to comment. …so thanks again for posting all that you do. So interesting!


    Tawnya    Aug 2, 02:14 AM    #
  15. And may I just say, that is a great icon you made; and nice to have a date. My birthday is that Monday and it’s the day I return to teaching after 9mos of leave after having my daughter. I’ll think of you that special week!


    Katharine in Brussels    Aug 2, 12:36 PM    #
  16. Looking lovely!


    — Sharon    Aug 2, 01:09 PM    #

Add a comment:

  Textile Help