Bridal planning update

Apologies but this is a bit of a “brain dump” post as I’m understandably a bit frazzled right now, with the BurdaStyle book deadline looming on top of wedding planning and everything else I seem to list every time I post (ahh, just thinking about it is starting to stress me out, sorry!).

So I haven’t done much tangible work on my gown since I last updated because I’ve been focusing on getting the BS book dress done since it has a more immediate deadline, but I’ve been doing lots of mental sewing on the gown. Which, you’ll remember, is half the battle for me. So I took an evening out to read (really read and digest!) through “Bridal Couture” by Susan Khalje and the OOP Palmer/Pletsch “Bridal Gowns—How to Make the Wedding Dress of Your Dreams” book (the former being way way more useful than the latter IMHO). I placed copious amounts of Post-It notes sticking out the edges at places I want to refer back to later.

I’m also really glad I ended up taking that PR online Underlining class a few months ago now!! Though I just looked to see if I could link to the Underlining class somehow, and I noticed Susan Khalje herself is teaching a “Wedding Gowns 101” class starting Aug 15. If it were a few months earlier, I’d have jumped all over it, but you need time to devote to the classes most evenings and I’ll need all the time I can get to work on my gown!

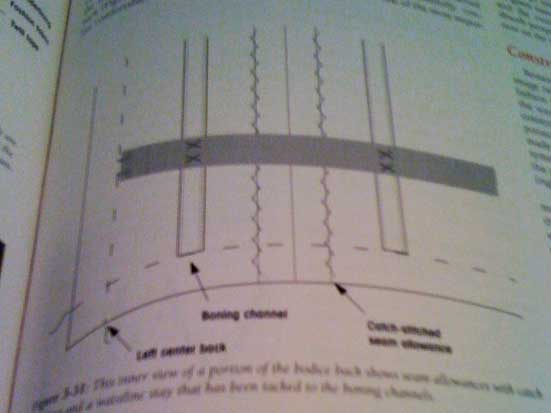
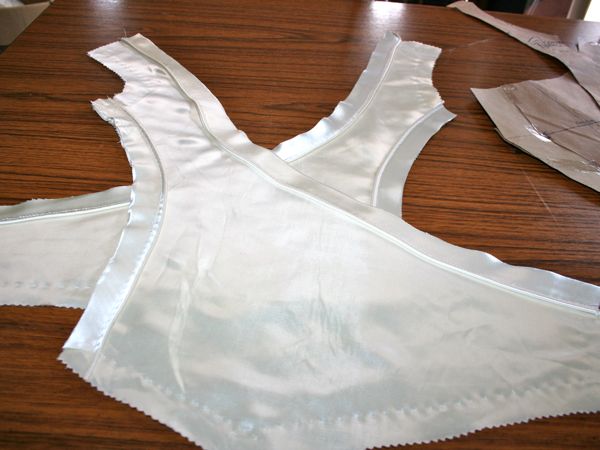
After reading through the two books I had everything mostly straight in my head about this dress, but the boning placement still puzzled me because my pattern doesn’t have any obvious vertical seaming to place the boning along, and all three examples in Bridal Couture had some sort of princess seaming. Luckily for me, it was easily solved on the PR messageboard and by this Susan Khalje article, so I’ve got a full gameplan in my head now for the dress!

Bridal bodice – Piping and basting

…in which I work with more piping than a plumber and more basting than a Thanksgiving dinner!

When I last checked in, I had cut and prepped all the pieces of the bodice, so it was now the point in my plan to sort out the piping if I was going to do so (and you’ve probably rightly concluded from the title that I did!). I had about 80cm of piping from the original dress’s waist seam, but I realised this wouldn’t be enough to pipe both sides of pieces #2 and #7 like I’d planned. So before I could do anything, I had to make some piping!

Luckily, the dress’s collar pieces were nice and long and on the bias, so this was a piece of cake. I cut four strips of 5cm wide and joined the edges together to make one long strip, then inserted my 2m of satin rattail and ran the whole thing through the sewing machine with the zipper foot.

But as I’ve already established, I can’t be making errant needle holes nor can I afford to use the seam ripper any more than what’s absolutely necessary, so in order to get the piping inserted perfectly on the first try, some hand basting was in order.

First, I basted the piping to one of the pieces, aligning the piping’s stitches with the basted seam lines:

And I did that for all four piped seams:

Sewing book review: Pattern Magic 3 – now in English!

I don’t buy sewing books very often these days, usually preferring to get my information and inspiration from the internet and sewing pattern magazines, but I’ve found so much inspiration from the Japanese design schools lately that I just can’t say no when these are translated into English.

If you recall, I reviewed the first two Pattern Magic books here, and then, just recently the first Drape Drape book was also released in English (with the second coming out later this year).

Drape Drape uses included patterns which you trace off and sew, but the Pattern Magic books all rely on instructions for altering your existing sloper, so they can work for pretty much any size or shape person.

The big difference in this third book is that all the patterns here are designed for stretch fabrics, which adds a whole new level of fun! But of course, this doesn’t mean you can’t use stretch fabrics for the designs in the first two books – I’ve already made the flip-turned top twice as teeshirts, though I did have a great boost in understanding the Pattern Magic instructions on the Morley College “Pattern Magic” course I took earlier this year (I’m eagerly awaiting the new course guide so I can sign up for the rumoured class on this new book next year!).

So enough intro, let’s have a look at some of the wonderful (and weird!) designs in this instalment!

Winter coat shortlist

With the Burda/Armani coat firmly OFF my list for my winter coat (a few of you suggested I could change/fix/alter the pattern but sorry, my time is too valuable to throw after a bad pattern. I know when to cut my losses and choose a better one!), I’m now in the process of picking a different winter coat pattern for my luscious and very thick ex-Burberry wool coating.

Since I scan all of the “At-a-glance” pages for my pattern magazines and store these in a private online gallery, looking through these and creating a shortlist is much, much easier than wading through each and every one of my magazines! I went through the gallery, and when I found a coat pattern I quite liked, I took a small screenshot of it (on Macs you can Shift-Apple-4 to draw a small square and only capture just that area), and renamed the screenshot to the pattern issue and number so I wouldn’t forget where it came from. Then I pasted all these into one big image so I can see all my choices at once.

This is the same process I used to narrow down my wedding gown pattern shortlist, but I cleaned the collage up a bit nicer in Photoshop this time around!


(click to see it bigger)

KnipMode Summer 2010 Roundup

I’m taken a brief moment to poke my head up from under my enormous pile of BurdaStyle Book sewing, wedding gown dismantling and bodice muslining, running, gardening, wedding planning, and some seriously busy office day-jobbing to bring you an overview of the summer KnipMode magazines… I’ll show off what I’m actually sewing if and when I can, I promise!

June 2010

This dress and skirt are ok, nothing to really grab me, but they’re nice enough basics. I mostly just liked that the model has wrinkles!

Woop! Another origami dress!