Crafternoon

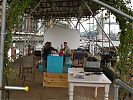
The moorings’ first Crafternoon was a smashing success! We normally have a monthly craft night amongst the neighbours, rotating around to different boats so no one person always has to host. Since our usual craft night falls on a Bank Holiday Monday in May (and again in August), we decided to move it to the afternoon and outside to the Arts Ark (which is like our little floating, communal village green).

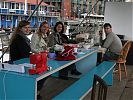
Rather than everyone coming at once, it was more of a drop-in thing, with different waves of crafters coming throughout the afternoon… Clare from Selvedge Magazine and her flatmate helped out with the organza wedding flowers, as did Susannah from Cargo Cult Craft! I was a bit crap with taking photos, though, so I missed the bulk of the crafters, sorry!

James raised the bar for “boy craft” and built a step!

Lavender confetti bags

We decided fairly early on that for our wedding confetti we were going to throw lavender buds instead of the traditional rice, birdseed, or tissue paper varieties (many of which are banned at venues these days anyway as they don’t break down readily enough). But I wasn’t quite sure how we’d portion these out to our guests until I saw this tutorial and free pdf label and got inspired to do something similar.

I ordered a ton of small glassine bags from this UK shop and we were planning on designing our own labels along the lines of the ones in the Mint Design link, but our laser printer decided to choose this point to run out of ink (after three years on the same cartridges, it’s still excellent value!) so we required a change of plans.

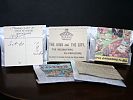
Stashed away in a drawer, I had a bag full of reproduction garden ephemera that my mom had bought be and thought I’d like, and I saw these old Amateur Gardening magazines, Woolworths flyers, bills of sale, and gardening catalogues as a perfect accompaniment to our vintage-inspired modern wedding. The reproductions vary in age from the 1910s to 1950s, and I just LOVE the way they look all mixed up!

DIY Wedding Fascinator – in progress

The Gown is progressing nicely, the shoes are bought and are being broken in little by little (while doing such glamorous tasks as watering the garden and taking out the rubbish!), so it’s now time to focus on my hair. In the past I’ve made fascinators (First in gold and then in silver) with a comb base that worked well for my long, thick, and straight hair, but post-chemo my hair is only two of those things so I’m using a headband for the base of this fascinator. In some strange twist of Life Imitating Art, my hair looks almost exactly like it does in the wonderful cartoon of us drawn by John Allison way back in March when I had barely any hair at all!

It appears that my “How to Make a Fascinator” tutorial vanished off BurdaStyle during one of their site moves, so I’m really glad I saved it as a Pdf a while ago so you can download it here now!

In the past my construction technique mostly centred around the glue gun, but for this one it just felt a bit wrong to do so when the rest of the ensemble is full of couture techniques. So for this base I used two teardrop shaped pieces of blue wool felt (the only colour I had on hand), with one of them stiffened with the ultra-rigid interfacing I used on my sun hat. I then covered this felt with a scrap of the vintage dress satin, stitched on the underside to prevent any puckers at the edges. You could omit this step if your felt matches the colour of whatever you’re covering it with, but the blue kept showing through the first few layers of feathers so I needed the satin layer.

I specifically chose a thin headband that had a fabric covering around it so I’d have something to anchor my stitches to, so keep this in mind while you’re shopping, as it’d be difficult to sew onto an all-plastic band (in which case you’re probably better off using glue). I then sewed the satin-covered base onto the headband, making sure my stitches went around the band each time for strength. Since the top was being covered in feathers, I didn’t bother to hide my stitches on the top side.

Once the decoration attachment is all complete, I’ll stitch the other blue felt piece to the underside of it all to hide the stitches (and band) and create a bit of grip on my hair.

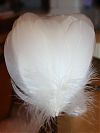
Here’s the fascinator with just the white goose feathers attached:
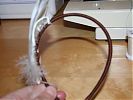
Sewing these onto the base was way easier than I was expecting. I just took 2 or 3 stitches over the central portion of the feather near the base, and that was enough to keep them secure. I’m leaving them unattached at the tips because as the headband stretches whilst worn, the feathers stay close to my head anyway.

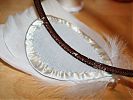
Here’s the underside so you can see my stitches and that super-stiff interfacing:
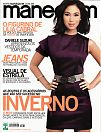
Manequim April & May 2010

Are you ready for some exquisite eye candy? Remember when I showed you my one and only Manequim magazine last year, and I raved about how amazing the designs were? Well, Susannah from Cargo Cult Craft came over for Crafternoon and brought not one but two issues of Manequim with her that a friend recently brought back from Brazil!

And she is WAY nicer than I am, because she actually let me borrow them! I can’t believe she let these pretties out of her sight for a week while I scanned and traced like a mad woman… I actually only ended up tracing three patterns, but I scanned a lot more so I could go back and draft others in my size when the inspiration strikes. Manequim may have an amazingly talented design team, but the sizes offered are really limited – usually only one size per each design, with a few patterns being offered in three sizes. Not to mention that the roadmap pattern sheets are crazy to trace from. They make the new Burda sheets look like child’s play…

So thanks to Susannah, we can all have a few minutes of total escapism, as we marvel at the inventiveness in these designs (no really, some of the pattern shapes are mental!).

Manequim April 2010

I actually rather liked the dress shown on the cover, until I saw in the tech drawing that the ruffles extend from the shoulder down to mid-thigh, and are only being held in by the belt. As far as I’m concerned, belts should never be required for a dress to look good!

Quick & easy tie-front teeshirt

I was so excited when I saw this tie-front teeshirt (#2) in the May 2010 La Mia Boutique!

It just ticks so many boxes – flattering neckline (check!), coordinating knits (check!), cute Daisy Duke-style tie (check!), and most importantly, it uses up those awkward leftover lengths of fabrics that are too big to chuck away but at less than 1m, are really too small to make much of anything from.

The other great thing is that this teeshirt was seriously quick to sew – I cut out the fabric when I got home from work on Friday evening, and in amongst making dinner and doing some reading, I had finished this before I went to bed, and without particularly rushing or staying up late, either. In fact, I liked it so much I wore it out to lunch and the cinema (to see Four Lions) the next day, and then again at Crafternoon!

Bridesmaids dresses – one down…

I made a big push on Sunday to get as much done on the first bridesmaid as I could, and between then and some “non-commuting” time yesterday and today (I worked from home both days so I put the hour I’d normally be commuting to good use!) I managed to finish Pip’s dress, apart from the hem and the covered buttons, which I need to purchase in town tomorrow.

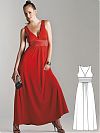
To refresh your memory, I’m sewing the Gant exclusive design dress from the Sept 08 Burda magazine:

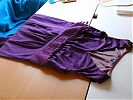
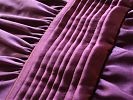
I tackled those pleated cummerbunds first to get them out of the way, but even the easier silk jersey portions were not entirely straightforward. With a design this simple, the glory is in the perfect execution!

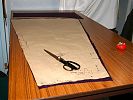
First thing I was grateful for is my newly-raised cutting and drafting table. Each gown takes four skirt sections this size (front & back, exterior & lining), and they take up nearly the whole table!

I didn’t take any intermediate photos of Pip’s dress, but I ended up doing the entire bodice on my sewing machine after all, so that I could understitch the neck and arm openings more easily. In the end, I only used the overlocker for the long skirt seams.