Double take!

Fashion has always been cyclical – we reinvent ideas from decades past and give them a new twist. But with everyone playing off similar influences, sometimes two designers independently come up with very similar ideas. So it’s really not a surprise that you can sometimes find very similar pattern designs across companies, too.

As I found out, once you start looking for “pattern twins”, suddenly you start seeing them everywhere!

Patrones vs Knip tops

It all started when reader Hilde pointed out in my Patrones 289 review that this Plus top looks an awful lot like an older KnipMode design, so I decided to investigate further by comparing the shapes of the pattern pieces side-by-side:

(This KnipMode top was previously neglected because it was in the same issue as the fabulous swimsuit pattern…)

While the tech drawings look different, when you look at the pattern pieces you can see that most of that is just down to artistic interpretation and the pieces are very similar indeed!

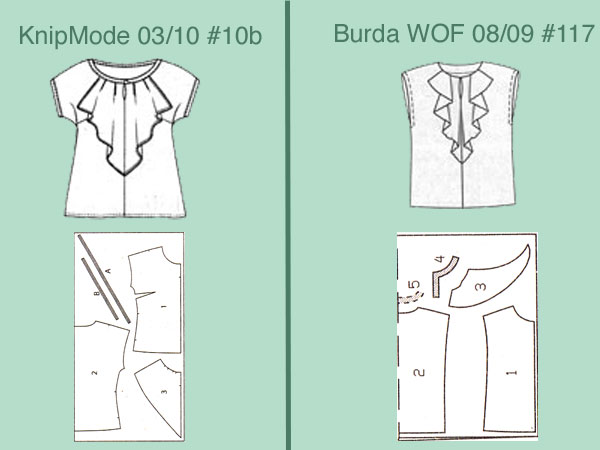
Knip vs Burda blouses

Then I noticed in my review of the March 2010 KnipMode that their ruffle-collared blouse was incredibly similar to one Burda released last year!

A double gauze day dress

A while back I’d heard of a fabric called “double gauze” that was supposedly perfect for hot weather, but at the time it was really only available imported from Japanese shops and really expensive at that! Fast forward a few years and it’s now much more readily available locally, so when I was in Brighton last August I bought some of their muted teal double gauze fabric (also available in a bunch of other colours), keen to try it out. Double gauze is two layers of cotton gauze/muslin fabric joined together with stitches in a grid pattern which creates a sort of seeersucker or quilted texture. It also means the two layers may not be 100% on grain to each other, and it really likes to shrink in the wash so be sure to pre-wash it.

I wasn’t quite sure what to do with it though until I saw the perfect day dress in the May 2019 edition of KnipMode magazine (#11, though #12 is a longer version with longer sleeves). The pattern is available to buy online, too, though be aware the instructions are in Dutch.

Double dusty roses

I was planning on sending my mom some flowers since she’s so full of worry for me right now. I even went as far as getting the number for their local florist and looking at bouquets online, but they just seemed so impersonal… But then, when I was on Goldhawk Road, I saw this dusty rose wool sweater knit in a shop and I instantly thought of my mom. For years, whenever anyone asked what her favourite colour was, she’d always reply with “dusty rose”.

So I had a look through my pattern archives and saw this fantastic cowl neck sweater in the very first KnipMode I ever bought (actually in a supermarket in Steenwijk, on one of the trips when we were buying our boat)!

Feb 2007 KnipMode, #23:

I think I must’ve got my love of interesting necklines from my mom, so I knew this was the pattern for her! And it just so happened to be plus sized, so I could combine a few sizes easily to get a cowl-necked sweater that was perfectly her!

It was a complete surprise and my dad helped to keep it that way until it arrived, and she said it made her day. So mission accomplished. 🙂 And here’s some more shots of it on my dressform, so you can see the neck shape and how it drapes nicely into place…

An asymmetric swimsuit

It’s been a while since I’ve had to write a negative pattern review but hoo boy, this one’s a doozy. The thing is, I ended up with a finished swimsuit that I really like and feel great in, but that’s in spite of this pattern, not because of it. I significantly redrafted all the pieces and relied heavily on another blogger’s instructions in order to get to the finished result.

I’m not even sure how the Edgewater Avenue “Marley One Piece” pattern came on my radar, tbh. I’ve never heard of the brand before, but they seem to specialise in swimwear sewing patterns and this particular one was on sale for $5 for a limited time, so I bought it.

Developing the Triumph Suit pattern

The Triumph Suit pattern is not only our first triathlon-focused pattern, or our first Advanced pattern, but I’m also fairly certain is the pattern that was in development the longest. And also very likely the one I nearly gave up on the most times (I don’t deal well with very long-running projects!).

So today I’d like to walk you through a bit of its development process so you can get a feel for the timelines involved and the sheer number of hours, weeks, months, and years that go into something as complex and specialised as this!

I started thinking about a trisuit pattern all the way back in early 2021 (I was still shielding during the time, remember!). It was the first inspiration to hit me since the disruption of 2020. During 2020 I concentrated on updating all of our patterns to be layered and projector-friendly, rather than developing anything new simply because I had zero energy for creativity. It started with me combining two blocks together and drawing out design lines – both on paper and on myself!

Tutorial: Make your own tri-belt!

I’ve signed up to race my first official duathlon in September (that’s run-cycle-run if you’re not familiar) and one of the things I need for the race is a tri-belt, which, having never done a triathlon myself, is something I didn’t own. A tri-belt is essentially an adjustable loop of elastic with two smaller elastic cords sticking out that you can affix a race number to.

The purpose here is to be able to attach your number to it so you can easily display it on your front as you’re running, and on your back as you’re cycling, without having to re-pin it in place! But when I went to purchase one, I saw how simple they were and thought “I could make that!” And honestly, it was so easy, I’ll show you how to, too! Hint: these also make great gifts if you’ve got a multi-sports athlete in your life!

Functional sewing – an invisible Axis and some porthole curtains

These two sewing makes don’t really “go together” except in the sense that they were both on my Summer Sewing list and they don’t seem terribly exciting to most people! The porthole curtains were on the list because the ones I’d made for the bedroom in 2014 were really looking ropey and mouldy, and the Axis Tank was in my plans because I really wanted a more comfortable, invisible option to wear underneath a few semi-sheer summer tops in my wardrobe now that I no longer wear “foam dome” bras.

You’d think that, like the Pietras, I’d have nothing more to say about the fantastic Sophie Hines Axis Tank pattern after the 5? 6? times I’ve already made it, but I surprised even myself here. I had some very thin biege silk-mix jersey in my stash for over a decade(!) that I thought would be perfect for creating a tank/softbra that matches my skin tone. One of the reasons I hadn’t used it much so far is because the fabric is so thin that it really needs a lining so couldn’t be used for a teeshirt, for example. But that wasn’t an issue here, as I could just double it up as its own lining!

Sewing the Cos “Made By You” Men’s Shirt

As I mentioned in my earlier post showing off this shirt as well as the women’s shirt, this post is to outline how to construct the Cos “Made By You” men’s shirt so that others in the future can construct it in spite of the very sparse video instructions provided with the pattern. A lot of this information may be a repeat of the women’s shirt post since the kits are very similar in structure, right down to the fabric and packaging provided.

Sewing the Cos “Made By You” Women’s Shirt

Earlier this week I showed you my finished version of the Cos “Made By You” women’s shirt kit with the promise of giving far, far more details on the kit itself and some construction instructions so strap on in! This is a HEFTY brain dump intended to help others who’ve bought this thinking they were getting a full sewing pattern, or who bought it and no longer have Cos’s video online to help. Or frankly, if you’re just intrigued about what a high street shop thinks a home sewing product should be!

The Sewing Weekender Number 3

No sooner were we back home from Iceland than I was on my way up to Cambridge for my third Sewing Weekender! The first year I was lucky enough to buy a ticket, then last year I gave my “Sewing for Movement” talk as a speaker, but this year I was determined to attend again and set my alarm in order to buy my ticket as soon as they went on sale.

No joke, these tickets were hotter than Glastonbury – we crashed The Fold Line’s site and tickets sold out in like ten minutes despite having doubled capacity this year to 100 places!