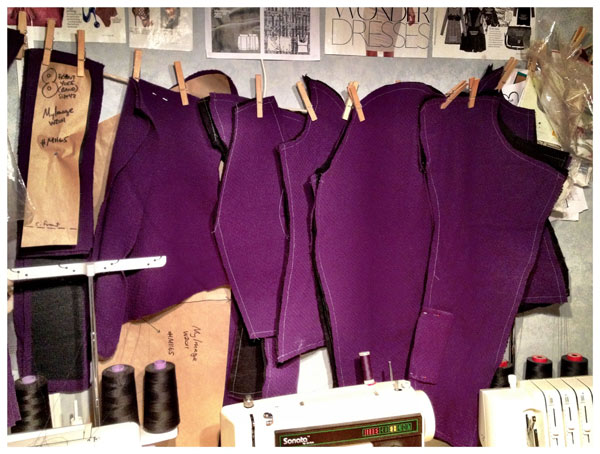
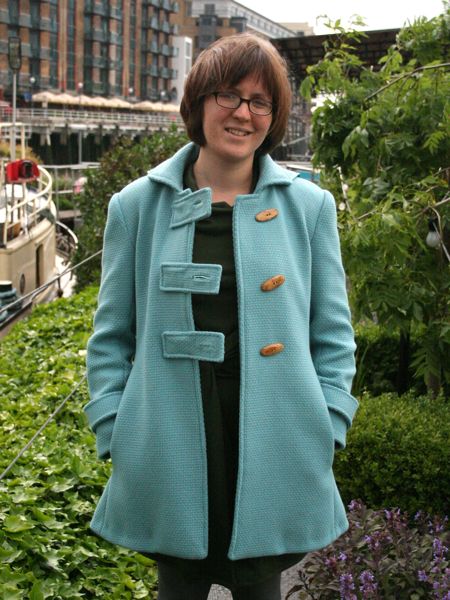
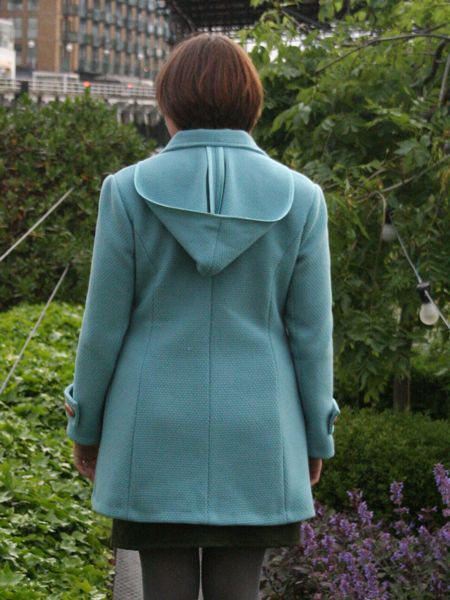
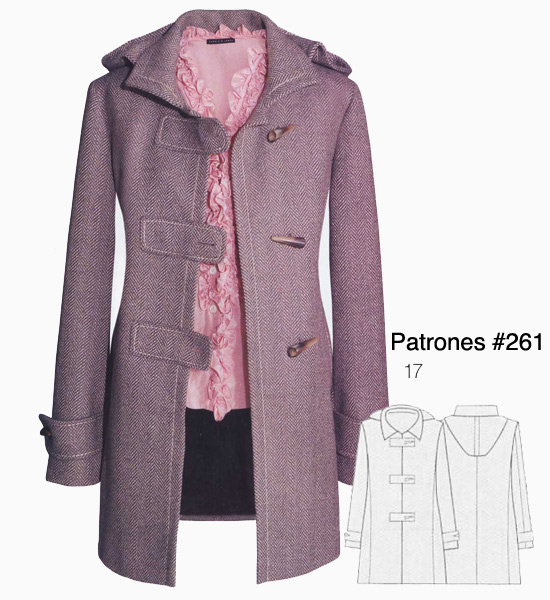
Patrones spring coat – finished shell

Are you thoroughly sick of the sight of the Patrones spring coat yet? Well, too bad, because it’s taking me forever!

The good news is, I sailed smoothly over the speed bump that caused me so many headaches and delays in making my winter coat – the bound buttonholes. I’d already decided that with such a thick, loosely woven fabric that’s so prone to unravelling, that I’d use the satin bias tape I’d bought for binding the hood seam allowances to also make the bound buttonholes.

So I pressed the satin bias tape flat, cut it down to 1/2 inch wide strips, then folded these in half (right sides out) to make the buttonhole “lips”. After basting my ladder stitches on all the coat tabs, I did the usual technique of sewing these lips to the right side and cutting open the buttonholes.

But here’s where I deviated a bit – since my wool unravels so much, I knew that trying to stitch those tiny triangles at the ends would just be an exercise in futility, so I pulled out some lightweight knit interfacing and cut out a tiny strip. I then pulled the triangles to the back and fused the interfacing over top to keep them out of the way:


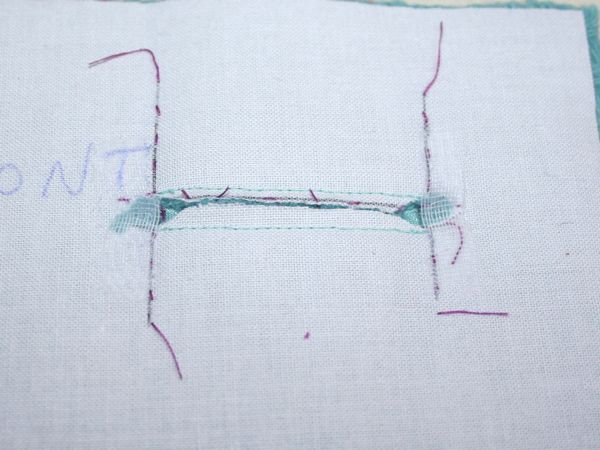
(It’s a bit hard to see but the mesh white interfacing over the left and right ends is there!)

MyImage Purple coat – in progress

Yesterday I mentioned that I’ve started sewing the asymmetric, collared coat from the Winter 2011 MyImage magazine, and after a prep period that felt like forever (probably exasperated by the fact that my ironing station is hovering around 0C/30F), I’ve now got some progress to show you!

I’m sewing this up in a wonderful purple basketweave/boucle coating, which was another gift from Claire (she’s so good to me!) at the end of last winter. I always like to underline my coats when I can to just add that little bit of extra warmth, but it made even more sense here as it will help to stabilise the coating fabric and prevent any bagging out that might otherwise occur with looser-weave fabrics. The alternative is to block-fuse the coating with a lightweight interfacing, like I did with my Patrones duffle coat.

For this coat, all the facings were interfaced (the usual front and back facings, plus the front and back hip band facings), and pretty much everything else was underlined in black cotton flannel. This meant there was a lot of prep – everything but like 3 pieces needed underlining or interfacing! I love sewing, but prepping is dull dull dull work!

I machine-basted the flannel underlining to the coat pieces here, because frankly, the prep work was tedious enough as it was. I normally hand baste my underlinings, but in this case, the coating and the flannel “grabbed” each other quite nicely, so this, plus the walking foot, plus a long basting stitch meant it felt okay to do it by machine. I still made sure to never turn any corners though (when basting underlinings, you always stitch to the edge, cut the threads, reposition, and stitch the adjacent side so that you don’t create puckers at the corner)!

The Winter Coat

Hooray, my winter coat is finally finished! As you may have seen with all the coat sewing activity going on around the internet lately, making your own coat is no mean feat! While you’re perfectly able to take some shortcuts, it’s still a several week time investment no matter how you look at it. It’s for this reason that lots of us chose to sew them over the holidays, as it doesn’t feel like quite such a long ordeal if you’ve got several full days to devote to it at one stretch.

If you remember, I used Patrones 285 #29, but with the collar from #28 and major changes to the pockets so that I can easily put my hands inside while I walk to work (which I did today wearing it! yay!). After a muslin, the main changes I made were to lower the waist seam to match my natural waist, shorten and widen the front darts, add walking ease to the lower centre front, and change the pocket design.

I’ve already made a lengthy post about the coat construction and hair canvas interfacing, plus tons of HAWT handstitching action, so if you’re interested in the couture techniques I used or some interior shots of the coat shell, please click through before reading on…

Patrones spring coat

By now, you should be fully familiar with Patrones #261-17, the spring duffle coat I’m making in turqouise basketweave wool…

After all, first it won the public vote, then you heard about how I bulk fused the tricky wool, then you saw all about my muslin and the resulting fit alterations, then you saw how I dealt with the tricky hood seam allowances and finally, last week you got a chance to see the bound buttonholes and the finished shell.

I’ve been concentrating on assembling the lining (and the lining pocket) all weekend, and finally finished all the handsewing at Monday night’s moorings crafty club!

Patrones spring coat – hood and more…

On Saturday I went shopping for supplies with Johanna Lu while she was holidaying in town, yay! We hit up Goldhawk Road and MacColluch & Wallis so I was able to get the rest of the supplies I needed for the spring coat, as well as stock up on a few things I knew would be difficult to get online for the rest of the year, like quality interfacings (I knows it when I feels it, okay?). She had the forethought to bring a camera along shopping, so you’ll have to stalk her blog for the next few days to see us giddy in fabric mecca!

I was very disciplined on Goldhawk Road and only bought three fabrics (at the end of the list there) – grey corduroy, since I adore the cords at one particular shop there and I don’t think I’ll be able to go back before Fall, a red & white cotton poplin with stylised flowers that’s already earmarked for two projects, and my one impulse buy – a very cool lycra jersey with tons of overlapping stripes going every which way. Oh, and the lining for my Spring coat.

Speaking of that Patrones spring coat:

Prepping for Patrones

Now that I’ve finished all my other spring projects (the Colette dress is coming, sorry for the delay!), I can now devote all my available energy toward making my spring coat, Patrones #261-17, as voted on by all of lovely you!

Also sewing along with me are Zoe (whom I borrowed and traced the pattern from originally!) and Houkje, who’s also tracing and joining in a bit later on, creating our own London-Patrones micro-Sewalong!

First off, Zoe says:
I took a quick photo this morning of the fabric I’m using for the coat.

The wool on the left is a remnant from the cloth house and not enough
for the whole coat. The velvet on the right is for the hood, button
tabs and possibly the collar if I don’t have enough of the wool for
that. I bought some great brass toggles on Walthamstow market (couldn’t
find them a 6am without waking the family up), but forgot about the tabs
on the sleeves so I need to get back soon to get some more. I’m looking
for a two tone lining in beige and turquoise to match the stripes in the
wool, but no joy so far. Need to find time to get over to Shepherd’s
bush I think.

Whereas for my coat, I’ll be using that great, soft teal basketweave wool, bulk fusing it with lightweight interfacing, before cutting, then overlocking all the cut edges to prevent fraying and unravelling.

I’ve got 4 yards of the wool, but only ordered 3 metres of the Vilene H180 lightweight interfacing. Only I forget it was super narrow, so by the time I laid it side by side on the wool, I only had about 1.5m of the wool covered. So I’m waiting to see if I can lay out all the pattern pieces that wouldn’t normally be interfaced onto the bulk fused section, and the pieces like the collar, facings and button tabs onto a section that I’ll cover with heavier interfacing to avoid having to buy more. Confused? Don’t worry, this plan might fail anyway…

Summer sheep pyjama addition

When I first thought I’d be going into hospital, I was anticipating wearing winter pyjamas, but with all the delays and waiting on a bed, it’s now rolling into summer time. Luckily, I sewed my pyjama sets in medium weight knits rather than thick fleeces, but I had a tiny bit of Sharon’s sheep fabric leftover so I thought I’d create more wearing options for myself.

If you recall, I made a snap-front long sleeve shirt and drawstring trousers before:

And now I’ve got a camisole to wear either under the long sleeve top or on its own with the trousers!