Bridesmaids' choice

The bridesmaids have chosen their dress design! The only parameters I gave them were that it had to be a knit dress (no way am I undergoing extensive fittings for them on top of my dress!), and they had to choose the same pattern. Luckily, both of them have similar body types so picking a pattern that suited them both was relatively easy!

So, drumroll….

I will be sewing up two versions of BWOF 09/08 #132, the Gant Exclusive Design dress:

Bridesmaids dresses – finished!

Both bridesmaids dresses for my September wedding are now finished! Since I’m sewing both of these plus my own gown, I stipulated that these had to be knit so that I could sew them early and my girls could feel free to gain or lose a few pounds without too much last-minute alterations hassle.

To refresh your memory, the three of us chose the Gant exclusive design dress from the Sept 08 Burda magazine:

The previous posts about these dresses spanned over a year (from our pre-illness, original wedding date), so to help you find them, here’s a handy list:

  1. Choosing the pattern
  2. Going fabric shopping and choosing their colours
  3. Tackling those pleated cummerbunds
  4. Finishing the first dress

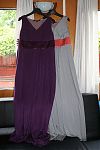
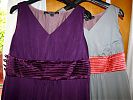
Here are both dresses together, so you can see how nicely their colours will go together on the day:

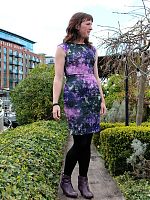
My galaxy-print birthday sheath dress

Happy birthday to meeeeee! I hinted about it last week, but I decided to celebrate the occasion this year by sewing up something special to wear, using a fabric that I’ve lusted over for months even before I broke down and ordered it. My feeling is that if you adore the fabric or pattern (or both!) then the resulting garment is pretty much guaranteed to be a hit.

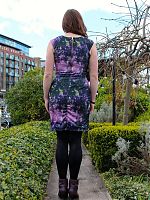
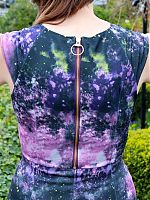
For this dress I used the Derek Lam-inspired knit sheath from the January 2014 Manequim magazine combined with the most amazing galaxy print ponte jersey which is even nicer in real life, I swear! It’s a digital print on a smooth, white ponte jersey base, and it’s both stable and stretchy, making it the bestest fabric ever (and I have just over a metre leftover! woo!).
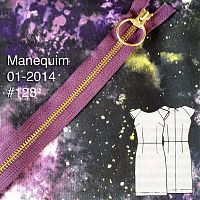
It’s been a while since I sewed a Manequim pattern and I’ve dropped in size over the past few months of marathon training to a 42 (Burda 40), so I decided to sew up a muslin of this first to test the fit. The resulting turquoise ponte muslin was very close fitting, and I wasn’t entirely certain at first whether it was too tight, or utterly perfect. So I lounged around in it for a day, decided it was comfortable enough, then cracked on with the final version without any pattern changes.

The final version is definitely tighter than the muslin, though, and I’m fairly certain it’s down to adding the lining layer, even though it’s stretchy! You can definitely see some horizontal pulls in the dress showing it’s a tad too tight, and it’s a struggle to get that waist seam on and off over my boobs, but one it’s on, it’s not uncomfortable, thankfully!
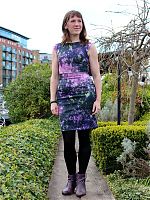
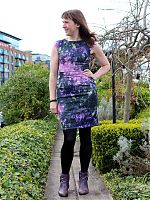
The pattern is really simple – a front bodice with both vertical and horizontal bust darts, back bodice with long vertical darts, raglan cap sleeves, and a skirt pattern with vertical waist darts (the same skirt pattern is used for both front and back). The pattern calls for a long invisible zipper, but as I could easily get the muslin dress on and off without it, I was going to leave it off the finished version, too…

…until I discovered the most perfect purple, metal teeth zipper in my stash! So then I decided I had to use it and make it an exposed zipper feature instead. It was a bit shorter than I’d have liked, but it reached exactly to the waist seam, which worked out nicely visually (though for ease of getting in and out of it, a longer zipper would’ve been much better!).

Lekala cowl top instructions and giveaway

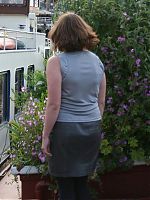
You’ve seen my version of this fantastic cowl top, now’s your chance to make your own and show me yours!

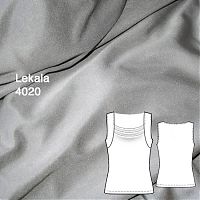
As you’ll recall, the above is made using Lekala 4020, but I’ve created sleeve bands on the back to echo the ones on the front, so our first step is to alter the pattern for this.

Here’s the (unaltered) tech drawing:

Lekala give full pattern pieces rather than placing some patterns on the fold, so the first thing I like to do is fold the front and the back in half. If you’re altering the back like me, then cut the back piece in half along this foldline (at the CB).

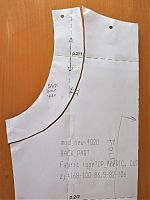
To echo the sleeve bands/yokes on the back, first lay the front sleeve band/yoke piece onto the back, and mark the corresponding widths at the back shoulder and the back side seam, so the two bands will align nicely when sewn together. Then, using the front yoke piece as a guide, draw a nice curve to join the two points, trying to keep the width of the yoke even. Lastly, draw a double notch somewhere in the lower half across the line, so you’ve got the notches on both the back piece and your new back band piece. Then cut along the line and treat as two pieces.

You’ll end up with something like this:

Our DIY wedding – the dresses, makeup, and final photos

Either groan or rejoice, but this is the last of the wedding posts!

The bridesmaids dresses

If you cast your mind back, you’ll remember the selection process, how I fitted and then hand-pleated, the lined, silk jersey dresses for my two bridesmaids, but even after I finished them, there wasn’t a chance to see either P or G wearing their dresses, let alone together!

It was really nice on the wedding day to be able to see both of my great friends looking so happy and nice, and comfortable, too, in the bridesmaids dresses I made for them.

Their colour choices really suited them both, too, and even though I offered to shorten them after the wedding, I know P (in purple) is definitely keeping hers as a wonderfully posh maxidress. (S was my Man of Honour, but no, I didn’t make his suit!)

My dress

You’ve seen it in pieces and finally, in comparison with my grandmother’s original gown, but here’s some more photos where you can see the seamlines particularly well:

A few wedding colours

If you recall, my two bridesmaids, Pip and Gez, had already agreed on the dress pattern they wanted, BWOF 09/2008 #132, the Gant Exclusive Design dress.

But neither were too excited by the silk jersey colour choices I brought home last time I was at Goldhawk Road, so I was expecting Saturday’s fabric-and-shoes excursion to take a while…

…but no! Both found the colours they loved within five feet of walking in the first shop! Classic Textiles had clearly restocked in the last month! Woohoo!

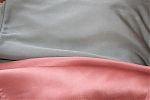
Gez fell in love with this silver silk jersey (which we bought the last of, bwahaha), choosing peach silk charmeuse (satin) for her dress’s “cummerbund”:

I did not sew this dress

I finished my birthday dress yesterday, so it just needs a final pressing and photoshoot this weekend before you get to see it on Wednesday! But in the absence of pretty green silk photos to coo over, I thought I’d do something different and share some photos of this amazing RTW dress I bought recently.

I bought this dress (now sold out) from AX Paris for an absolutely astounding £20! By the time I got to it, most of the sizes were sold out, so I took a chance and bought my pre-illness size with the thought that it’d be a fantastic goal dress later this summer. To my surprise, I was able to get into it and get the zipper up, but it was not pretty without the girl’s best friend, Spanx, so you’ll get to see it on Susan instead (though as it turns out, Susan needs some Spanx, too, as I couldn’t get the zipper entirely closed on her!) –

Wedding dress ideas

We visited our venue (and totally geeked-out at the museum!) on Saturday and met with the wedding coordinator there so we now have a date – the rather auspicious 19 September 2009. Or to put it another way, 19.09.09 (09/19/09 for the Americans)!

Good thing we have over a year though, because we’re going to need every single day of that to save up and prepare for it. Oh my, the grand total was an eye opener, and we’re not being frivolous in the slightest with our plans!

Luckily, then, my grandmother has given me her gown from her wedding in 1949. She’s insisted I use it and NOT be afraid to cut it up, saying she’ll cut it herself if I don’t, or donate it to goodwill or sell it on eBay. I think it’s her way of not letting me get too scared about changing it or treating it like a relic or something. In any case, I’ve seen photos of it, but I’m going to make you all wait until it’s shipped over to me, cleaned, and pressed before I document its “before” state properly.

Until then, here’s my rough sketch based on the photos and my mom’s eyewitness account: