Vintage wedding gown detail photos

My grandmother’s wedding dress arrived safely on Friday! I person, it’s absolutely jaw, droppingly gorgeous, even 59 years later. The preview photos I drew the technical drawing from didn’t do it justice, so I’m hoping these photos on James’s DSLR will help to show some of the amazing vintage details.

The dress is entirely silk satin with no lace, embroidery, or beading (just from a mesh panel around the neckline), and the weave of the silk is still perfectly and soft and so very strong still. Granny told me she bought this in a shop on South Street in Philadelphia in 1949, but I’m afraid I can’t tell you the designer as there’s no label and she’s long since forgotten the details. But the workmanship speaks for itself, and it’s very interesting for me to see that they’ve not wasted any silk where it couldn’t be seen – the mesh fabric is used for all facings, the seam allowances are only 1/2 inch, and there’s no lining.

Laid out on our table:

DIY Wedding Gown – attaching the bodice and skirt

Finally I can give you another progress report on the wedding gown! Don’t worry, as you can see below, I’ve been continuing to work on it on my weekends and Wedsnesdays, so I’ve got a lot of progress to cover!

For the first time I got to turn my attentions to the skirt, which is exactly as it was when it was attached to Granny’s dress, albeit separated from the bodice at the (very gathered) waist seam. But there was a prominent blue stain in the centre front (CF) panel at about thigh-height from the blue tissue paper it was wrapped in for 60+ years, so the first step was to unpick and remove that entire panel. I then moved the two triangular sections that had been on either side of it together to form a new CF:

I actually prefer the way these two look together, forming a beautiful triangular, almost art-Deco detail at the CF!

But back to the bodice, where I had completed prickstitching along the entire neck and arm edges. I just free-handed this without my post-it guide and I actually think this looks better than my zipper insertion!

Vintage wedding gown photos

So you’ve already seen a bunch of detailed photos of my Granny’s gown (from 1949) laid out flat, but I wanted some on a real person so you could really see the style lines and how it falls. And this way I can get some nice Before and After shots when I refashion it into my gown for September.

Big big big HUGE thanks to my neighbour Kate who not only fit into this tiny dress (respect!) but actually humoured me and let me take photos of her in it to post to the internet (Secretly, I think she had fun!). Kate’s also engaged and I was thrilled to learn that she’s not having wedding colours, either!

So let the vintage dress photos commence!

Burda magazine July 2016

Burda definitely keep up with the seasons, but I still kinda miss the reliable rhythm that the issues used to have back in the day – January had loungewear, March was always the wedding special (the only one they’ve reliably kept!), some menswear in April, May had tons of dresses, August was the Fall fashion previews (and usually maternity, too), cocktail dresses every November, and evening gowns in December. But my least favourite was always the summery beachwear in the June and July issues, because there was pretty much nothing I could wear in an English summer, where it rarely gets about 70-75F (25C)!

But in recent years Burda have been mixing things up, and the old scheduling has given way to more unpredictable features, which I think gives more variety and appeal to a wider rare of sewists. This issue certainly has a lot more than I’d usually like from a July!

A whirlwind of activity

You can pretty much assume by this point that if I’ve gone a bit quiet on this site, then it probably means I’ve been sewing up a storm behind the scenes and am just struggling to find the time to tell you all about it! And yes, it’s happened again… So I’ll try and catch you up on a bunch of things at once!

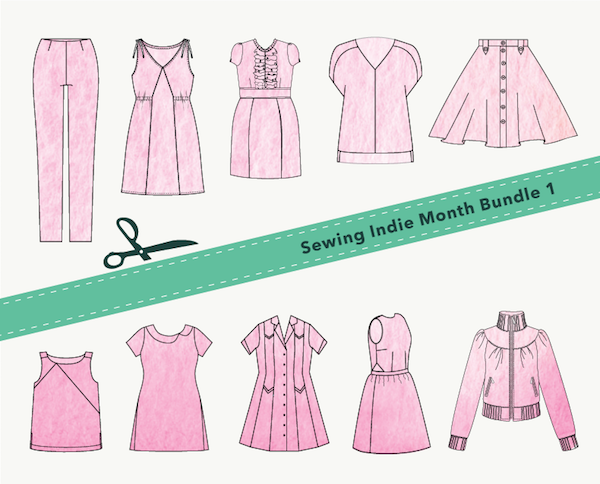
Sewing Indie Month – Pattern Bundle 1

Remember how much fun Sewing Indie Month was last year?? It was a full month full of interviews, great tutorials (like Heather Lou showing you how to turn my XYT Workout Top into a summer maxi dress!), and fabulous Sew Along prizes and it’s back again this September!

But because us pattern designers know how much you all love a bargain, we’ve joined forces to create two pattern bundles in advance of Sewing Indie Month, and the first pattern bundle is on sale now through Wednesday 12 August only.

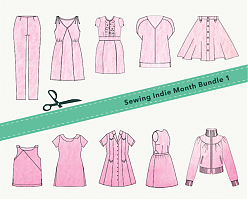
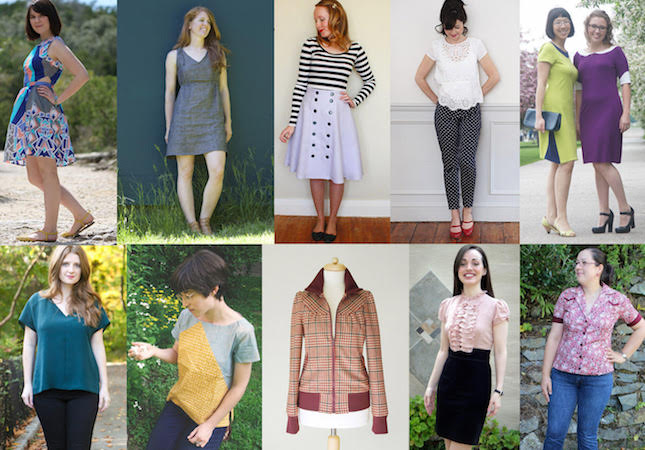
Click through to see all the included patterns and the different tiers, including some brand new patterns exclusive to this bundle! The cool thing here is that you’re not only buying these patterns for well under the usual price, but 20% of bundle proceeds will be donated to the International Folk Art Alliance, which provides education and exhibition opportunities to folk artists from around the world. So you’re helping out other crafters, too!

I made the Lolita Patterns Sugar Plum dress a few years ago and honestly, it’s one I still wear in regular rotation (and looks so much better than the photos in my post, annoyingly!). The Sugar Plum dress is a knit/woven hybrid, but the patterns in this first bundle are mostly wovens, so the sale timing gives you time to make muslins before the sewalong contest begins in September while supporting small women-owned businesses and raising money for charity. You can see the size range for each of the included patterns here, too.

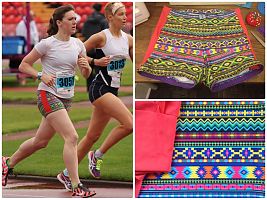
Aztec Duathlon Shorts

Psychologically, short shorts make me run faster. Well, not really, but I think they do, and that’s all I need! So, a few weeks ago, with the British Transplant Games coming up, I managed to squeeze out a new pair of Duathlon Shorts for the occasion!

The Swirl Sheath Dress

This dress has been an awfully long time in the making. The idea started back when I took the Pattern Magic 2 class at Morley College last winter, where we learned a technique called “Fundamentals: Create three-dimensional forms with design lines only” (it just rolls off the tongue, eh?).

Essentially what this means is you sew up a muslin, draw design lines all over it, cut along these lines, then introduce snips of ease until the pieces lie flat, and there’s your new pattern! I did all this (based on a sheath dress from the June 2012 Burda magazine, which doesn’t appear to be on the US BurdaStyle, sorry) last summer, but then the project stalled when I couldn’t find any heavyweight stretch satin anywhere in Europe, and had to import this gorgeous salmon stretch duchesse from Gorgeous Fabrics.

Then there were further delays as I didn’t have a wide enough cutting table to lay out the asymmetric and strangely-shaped pieces, until a few weeks ago when the Thrifty Stitcher invited me to pow-wow at her studio and suddenly my swirl sheath dress was back on track!

Because all the darts from the original pattern (bar one) are now incorporated into a bunch of curved seams, this means there’s a lot of easing going on, so if you don’t like easing princess seams, for example, you really won’t like sewing this. My easing motto is “pin the crap out of it”, and I’m proud to say that I didn’t have any tucks or unpicking in any of these seams. Though I did use 58 pins on just the lower semi-circular seam!

Bridal bodice – buttons, lining and shopping!

Ok after that little lingerie diversion (and a day spent being filmed for BBC1!), we’re back on the wedding gown!

First up was a quick fitting of the shell with all the boning pieces inserted and the waist stay hooked. And I can breathe a sigh of relief, because it’s looking good. A tiny bit of horizontal pulls around the zipper (which can be fixed by laying off the ice cream a bit) and a bit of boning show-through at the centre front (which I’m going to hold off worrying about for now, but I may just shorten that boning piece so it stops below the bust).

So I can push on ahead, safe in the knowledge that there’s no major fitting issues…

First up – I sewed on all 13 original covered buttons along the right side’s zipper, matching up with the original satin loops I placed along the overlap during the zipper insertion step.

On the surface, these look like ordinary covered buttons, but look at the underside!

I’ve never seen buttons like this before in my life! Instead of a shank with a hole, there’s a mound of stuffed fabric to sew through! What a strange vintage detail! I’ve learned so much from taking the original gown apart…

Bridal Bodice update

When you last heard about my wedding gown, it was two years ago(!!) and I was leaning towards turning my Granny’s gown from 1949 into something with a cowl neck, deep back, and sleek lines, using Vogue 2965 as my starting point.

But recently I’ve been looking more closely at the fabric I’ve got to work with in my grandmother’s gown, and my recent cowl sewing adventure has reminded me that cowl necks need pretty huge amounts of fabric, can’t easily be pieced together, and on top of that, the silk satin in her gown is more of the heavyweight duchesse variety than something very drapey that would cowl nicely. And while I love a low back, it does make things awkward for bras and any sort of shapewear, too.

So I had a bit of a wake up call and told one of my bridesmaids to keep reminding me that “This is just one dress. It is not all dresses.” (thanks, Stacy!). Yes, I like cowls. But I also like other things, too. And I do not need to put everything I like into one dress!

Bridesmaids dresses – finished!

Both bridesmaids dresses for my September wedding are now finished! Since I’m sewing both of these plus my own gown, I stipulated that these had to be knit so that I could sew them early and my girls could feel free to gain or lose a few pounds without too much last-minute alterations hassle.

To refresh your memory, the three of us chose the Gant exclusive design dress from the Sept 08 Burda magazine:

The previous posts about these dresses spanned over a year (from our pre-illness, original wedding date), so to help you find them, here’s a handy list:

  1. Choosing the pattern
  2. Going fabric shopping and choosing their colours
  3. Tackling those pleated cummerbunds
  4. Finishing the first dress

Here are both dresses together, so you can see how nicely their colours will go together on the day: